
That soft, dark patch on your windowsill is almost certainly wood rot, and the fix depends entirely on what happens next. Stop any active water intrusion first, then press a screwdriver into the spot. If it sinks in with little resistance, you’ve confirmed decay. Small surface rot is a weekend DIY job; anything structural or spreading needs a professional look before you touch a chisel.
TL;DR:
- If the water intrusion source isn’t fixed, epoxy repairs won’t last long, as ongoing leaks will reintroduce moisture that causes further decay.
- Damage more than 10% of the sill surface or near load-bearing hardware typically requires full replacement rather than patching or epoxy filling.
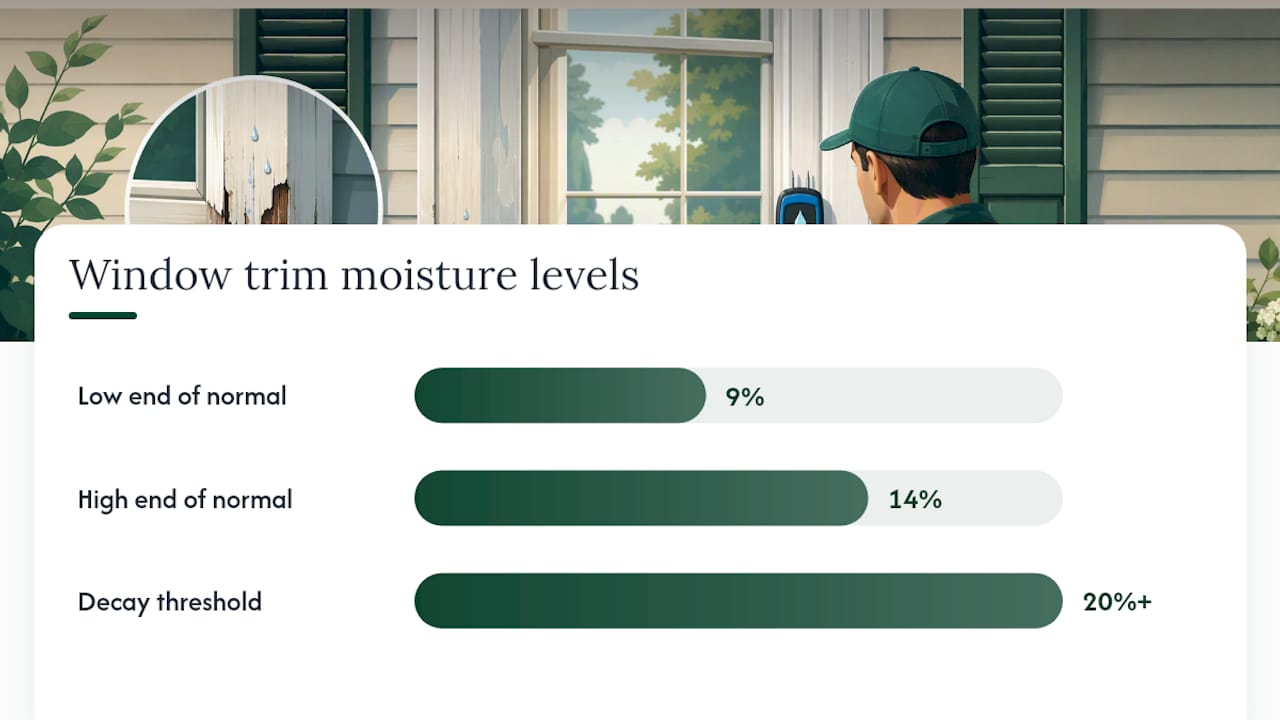
- Moisture readings over 20% or probe depths exceeding a quarter inch indicate a high likelihood of ongoing fungal decay and structural weakening.
- Proper assessment involves confirming water path closure before choosing between surface repairs, splice jobs, or full sill replacement.
- Always address exterior water entry points such as flashing, drip caps, and gutters before repairing the internal wood to prevent recurrence.
Table of Contents
- How to Spot Wood Rot Around Windows
- Why Wood Rot Forms Around Windows
- How Bad Is the Rot? Assessing Severity Before You Repair
- DIY Repair Options: From Temporary Patch to Permanent Epoxy Rebuild
- When and How to Splice or Replace Frame Parts
- When to Call a Pro (and What They Should Do)
- Prevention Checklist: Stop Rot Before It Starts
- What Star Windows Solutions Handles for Professional Rot Repair
- Health and Safety Precautions When Handling Wood Rot
- How Wood Rot Hurts Your Window’s Energy Efficiency
- What Happens If You Ignore Wood Rot Around Windows
- What the Evidence Actually Supports Here
- Get a Free Estimate From Star Windows Solutions
- Sources
- FAQ
How to Spot Wood Rot Around Windows
Wood rot around windows rarely announces itself with a collapsed sill. It starts quietly, usually where you’re least likely to look until paint starts bubbling or a windowsill feels spongy under your palm.
The visual cues are consistent enough that you can train your eye in a few minutes:
- Paint that’s peeling, cracking, or bubbling in a localized patch rather than across the whole frame
- Wood that’s discolored, gray, or noticeably darker than the surrounding material
- Crumbling or flaking edges, especially where two pieces of wood meet
- Swollen or distorted joints that no longer sit flush
- A musty, earthy smell near the window, which often shows up before visible damage does
Once you spot a suspect area, the probe test settles the question. Take a screwdriver, an awl, or even a stiff key, and press firmly into the wood at a slight angle. Healthy wood resists; it feels solid and pushes back. Rotted wood gives way. According to This Old House, if the tip sinks in noticeably with little resistance, you’re dealing with structural decay that needs stabilization, not just a paint touch-up.
Rot concentrates in predictable spots: the sill (the horizontal piece you rest a coffee cup on), the lower rails of the sash, and the glazing putty that seals glass into the frame. Water runs downhill and pools at these low points, which is exactly why they fail first.
Pro Tip: If you own a moisture meter, take readings at the suspect spot and at a dry reference point on the same window. Exterior trim normally reads between 9% and 14%; anything climbing past 20% signals the moisture level where fungal decay can take hold.
Why Wood Rot Forms Around Windows
Rot is a moisture problem before it’s a wood problem. Every case traces back to water finding a way in and staying long enough for fungus to establish itself, and windows have several vulnerable entry points built into their design.
Failed flashing is the most common culprit. Flashing directs water away from the window opening, and when it’s missing, corroded, or installed backward, water runs straight into the wall cavity and pools at the sill. A missing or damaged drip cap above the window does similar damage, letting runoff wash down the face of the frame instead of clearing it. Old, cracked glazing putty around the glass panes is another frequent leak point that homeowners overlook because it looks cosmetic rather than structural.
Paint and finish failure speeds everything up. Once a protective coating cracks, exposed end grain (the cut ends of boards, where wood fibers act like a hundred tiny straws) soaks up water far faster than the flat grain does. Clogged gutters and poor sill drainage add another layer of exposure, keeping water in contact with the frame longer than it should ever sit there.
Common water-entry points to check first:
- Flashing above and around the window opening
- The drip cap, or lack of one
- Glazing putty and caulk lines
- Gutters and downspouts near the window
- The sill’s outward slope, which should shed water away from the house
There’s also a real difference between wet rot and dry rot worth understanding. Wet rot stays localized to the wet source and stops spreading once the moisture is gone. Dry rot, caused by different fungi, can spread through relatively dry wood and even migrate into masonry. Building Science Corporation notes that sills fail first simply because they’re the low point that catches gravity-fed water, which is why fixing the water path always comes before repairing the wood itself.
How Bad Is the Rot? Assessing Severity Before You Repair
Not every soft spot needs a full sill replacement, and not every “small” patch is actually small. A few objective checks take the guesswork out of that decision.
Start with the probe depth. Press a screwdriver into the wood at several points across the suspect area. A shallow give of an eighth inch or less usually means surface softening you can treat with a consolidant. But once the tip sinks in more than a quarter inch with little resistance, you’re looking at genuine structural decay, and the repair method changes accordingly.
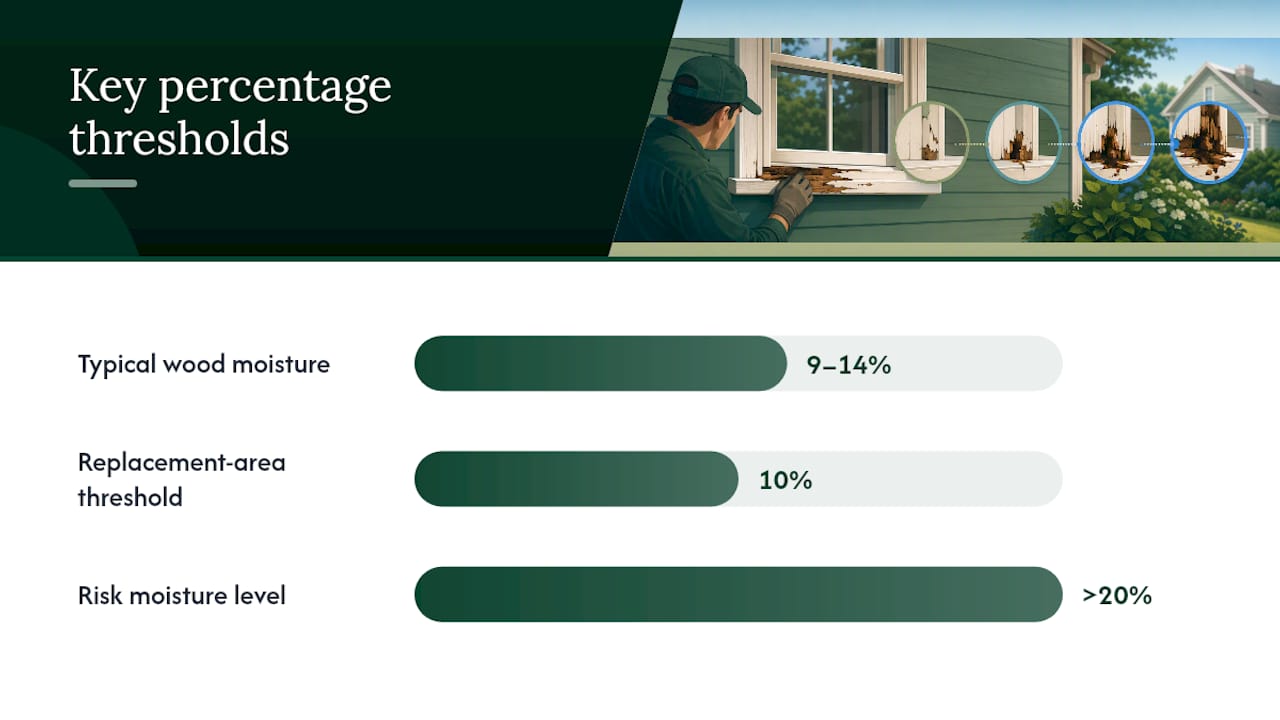
Next, estimate the percentage of affected area. This is where a lot of DIYers get overconfident. Popular Mechanics points to a widely used rule among builders: if rot affects more than roughly 10% of a sill’s surface, or if it compromises structural fastening points, replacement usually beats repair. Ten percent sounds generous until you realize it’s often just a few square inches on a standard sill.
Moisture readings add another data point. Exterior wood in good condition typically reads 9% to 14% moisture; readings consistently above 20% mean conditions are right for fungal decay to keep spreading even after you patch the visible damage.
Watch for these warning signs that point toward a specialist rather than a weekend project:
- Softness that extends beyond the visible discoloration when probed
- Rot near hinges, sash locks, or other load-bearing hardware
- A musty smell with no visible source, suggesting hidden spread inside the wall
- Rot on multiple windows at once, which often points to a shared flashing or drainage failure
DIY Repair Options: From Temporary Patch to Permanent Epoxy Rebuild
Once you’ve confirmed limited surface rot, you’ve got a real choice between a quick stopgap and a repair that outlasts the window itself.
A temporary patch buys you time when weather or scheduling won’t allow for a proper fix right away. Cover the exposed wood with plastic sheeting or exterior-grade tape to block water, and avoid packing the gap with spray foam or standard wood filler. Both trap moisture against the wood and can accelerate the very rot you’re trying to stop, a shortcut Popular Mechanics specifically warns against.
For a lasting fix on surface-level to moderate rot, the epoxy consolidant method is the standard professional approach:
- Remove all soft material. Dig out every trace of punky, crumbling wood with a chisel or oscillating multi-tool until you reach solid material that resists the probe test.
- Let the area dry completely. Repairing wet wood traps moisture under the repair and guarantees failure. Give it a few dry days, or speed things up with a heat gun on low, held at a safe distance.
- Apply a liquid wood consolidant. This thin, penetrating resin soaks into the remaining fibers and hardens them from the inside out, giving the epoxy something solid to bond to.
- Pack in two-part epoxy putty. Mix only what you’ll use in the next few minutes and press it into the cavity, slightly overfilling since you’ll sand it down later.
- Shape and sand. Once cured, epoxy putty sands like hardwood. Match the original profile as closely as you can.
- Prime and paint. Epoxy needs a coat of exterior primer before paint will adhere properly and hold up outdoors.
Tools and materials to have on hand: an oscillating multi-tool or sharp chisel, a wood consolidant, two-part structural epoxy putty, sandpaper in a couple of grits, exterior primer, and matching paint.
This isn’t a same-day project. Consolidants typically need several hours to fully penetrate and harden, and epoxy putty needs its full cure window, often 24 hours, before sanding. Two-part structural epoxies don’t shrink like standard fillers; they bond directly into the wood fibers and can last many years when applied properly.
Pro Tip: Work in a ventilated space and wear nitrile gloves and eye protection when mixing epoxy. If you’ve never used a particular consolidant or putty brand before, mix a small test batch on scrap wood first to check cure time and color match before committing to the real repair.
When and How to Splice or Replace Frame Parts
Sometimes the rot outruns what a putty knife and epoxy can fix, and that’s when you’re choosing between a splice repair and a full sill replacement.
The deciding factor is extent and structural role. If the damage covers more than that 10% threshold, or if it’s undermined a spot where hardware or the sash actually bears weight, cutting out the damaged section and splicing in new wood, or replacing the sill outright, is the more durable path. Trying to epoxy your way through a badly compromised sill often costs more in labor than starting fresh, a tradeoff StructureTech’s home inspection team has documented in real repair jobs where salvage efforts ran longer than expected.
A splice or sill swap generally follows this sequence:
- Remove interior and exterior trim carefully to expose the full sill
- Cut back to solid, sound wood well beyond the visibly damaged area
- Fit and dry-test the new piece before permanent fastening
- Fasten with stainless steel screws to avoid future corrosion staining
- Seal all seams and reinstall or upgrade flashing before closing everything up
- Prime and paint every exposed surface, including cut ends
Material choice matters here. Rot-resistant species like cedar or treated pine keep the traditional look and take paint well, but they still need diligent maintenance. Cellular PVC won’t rot at all and handles moisture indefinitely, though it costs more upfront and can look slightly different from painted wood up close. Either way, installing or retrofitting proper flashing and drip caps during the repair matters as much as the wood itself. Splice in beautiful new lumber over the same failed flashing that caused the original rot, and you’re just restarting the clock.
When to Call a Pro (and What They Should Do)
Some situations aren’t DIY territory, no matter how confident you feel with a chisel. Call a professional when you see any of these:
- Rot that extends into the structural framing behind the window, not just the visible trim
- Signs of dry rot, including damage spreading into wood that never got directly wet
- Leaks that keep coming back after you’ve patched them once or twice already
- Soft spots you can’t fully access, suggesting hidden damage inside the wall
A proper professional inspection goes beyond a visual glance. It typically includes moisture mapping across the frame and surrounding wall, a check for hidden damage behind trim and siding, and a clear recommendation on repair versus full replacement, backed by the reasoning behind it.
Cost is often the deciding factor between the two. Labor for a careful epoxy repair on a badly rotted sash can run close to what a full replacement costs, since both take real skill and time, a point StructureTech makes plainly in its own repair case notes. When you’re vetting a contractor, ask about their warranty terms, whether they address the water source and not just the wood, and whether they’ll show you moisture readings before and after the repair.
Prevention Checklist: Stop Rot Before It Starts
A repaired window rots again if the conditions that caused it the first time never got fixed. Building a short seasonal habit around your windows costs almost nothing and saves you from redoing this same project in three years.
Run through this list once a year and after any major storm:
- Inspect flashing and drip caps for gaps, rust, or improper overlap
- Re-caulk any cracked or missing bead around the frame perimeter
- Repaint or refinish exposed wood as soon as the coating starts to fail, not after
- Clean gutters and downspouts so water isn’t backing up near the window
- Confirm the sill still slopes outward to shed water rather than holding it
Spring and fall are the natural windows for a full check, since freeze-thaw cycles in winter and heavy summer storms are what expose weak points fastest.
Pro Tip: Keep a small tube of exterior caulk and a matching paint pen in a kitchen drawer. Catching a hairline crack in five minutes beats discovering a rotted sill five years later. Partner resources like Drapery Company’s guide to wood care cover similar moisture-control habits for wood trim elsewhere on the house.
What Star Windows Solutions Handles for Professional Rot Repair
Star Windows Solutions works on the full range of rot damage homeowners run into, from surface-level sill restoration to complete frame rot repair and replacement when the damage has gone structural. That includes sill restoration, casement repair, and the related hardware and sealing work that keeps a repair from failing again.
Direct professional service makes sense once you’re past simple consolidant-and-paint territory: complex splice jobs, cases where financing the repair matters, or situations where a warranty backing the work matters. For readers weighing DIY against hiring out, the window sill rot repair and restoration page walks through what a professional assessment actually looks for.
Health and Safety Precautions When Handling Wood Rot
Rotted wood isn’t just structurally weak, it’s often actively hosting fungal spores, and disturbing it releases them into the air right where you’re breathing. That’s worth taking seriously before you start chiseling.
Wear an N95 mask or better at minimum when removing decayed wood, since dry, crumbling rot releases fine particles easily. Safety glasses matter too; flying splinters and debris from a multi-tool or chisel go exactly where you don’t want them. Nitrile or heavier work gloves protect your hands both from sharp tool edges and from prolonged contact with damp, potentially moldy material.
Ventilation matters more than most people expect indoors. If you’re working near an open wall cavity or removing trim from the interior side, run a fan to push air outward and keep spore concentration from building up in the room. Bag and seal removed rotted wood in heavy plastic before it goes in the trash, rather than leaving loose debris to dry out and scatter dust around your yard or garage.
If you spot black or green-tinted mold growth alongside the rot rather than the typical brown or gray decay coloring, treat it as a mold problem first. Scrubbing visible mold off wood with a stiff brush and a mild detergent solution handles light surface growth, but heavy colonization inside wall cavities is a job for a mold remediation specialist, not a weekend project. Rot and mold often travel together because they both need the same damp conditions to thrive.
How Wood Rot Hurts Your Window’s Energy Efficiency
A rotted sill doesn’t just look bad, it actively works against your heating and cooling bill every single day it’s left unrepaired. Rotted wood loses its cellular density, and that lost density is what gave the wood its insulating value in the first place.
As decay progresses, gaps open up between the frame and the sash, or between the frame and the surrounding wall. Those gaps let conditioned air leak straight outside and let outdoor air pour in, undermining whatever weatherstripping or double-pane glass you’ve got doing the heavy lifting elsewhere on the window. You end up paying to heat or cool the outdoors through a hole you can’t even see from across the room.
Moisture trapped in decaying wood also conducts temperature differently than dry, sound wood does, creating a cold spot in winter that can contribute to condensation on the interior glass or frame. That condensation, in turn, feeds more rot, which is exactly the kind of feedback loop that turns a small sill repair into a full frame replacement if it sits too long.
Sealing and repairing rot promptly restores the window’s ability to do its actual job: keeping conditioned air where you paid for it to stay. If you’re already dealing with drafts or fogging on a badly rotted frame, it’s often worth pricing out full replacement alongside repair, since a new energy-efficient unit can solve both the rot and the efficiency loss in a single project.
What Happens If You Ignore Wood Rot Around Windows
Rot doesn’t pause while you decide whether to deal with it. It keeps consuming wood fiber, and the damage compounds in ways that go well beyond the window itself.
Left alone, decay spreads from the sill into the jambs, then into the framing lumber inside the wall, and eventually toward the sheathing and studs that hold up that section of your house. What started as a fixable eighth-inch soft spot can, over a few seasons, become a repair that involves opening up drywall or siding to reach framing members the window repair never would have touched.
Rotted, moisture-soaked wood is also exactly what carpenter ants, termites, and other wood-destroying insects go looking for. Soft, damp wood is far easier for them to tunnel through than sound lumber, so an untreated rot pocket can turn into an active pest infestation, adding a second repair problem on top of the first. Once insects are established, treatment and repair both get more expensive.
There’s a structural ceiling to how long you can wait, too. A window opening depends on its surrounding framing to stay square and properly supported. Enough decay in the wrong spot can let a frame shift, which throws off how the sash operates, how well it seals, and eventually whether the opening is sound enough to support a replacement window at all without additional carpentry. Catching rot early keeps the fix contained to the window. Waiting turns it into a house problem.
What the Evidence Actually Supports Here
Most advice on wood rot either oversells the DIY route or scares homeowners straight into a full replacement quote they didn’t need. Neither extreme holds up once you look at what actually determines outcomes: depth of decay, percentage of surface affected, and whether the water source has been fixed.
The overlooked piece is that sequence matters more than technique. A flawless epoxy repair on a sill with unresolved flashing failure is a repair you’ll be redoing in two or three years, because the water never stopped coming in. That’s the gap most DIY guides skip entirely, they walk you through mixing epoxy putty and skip the fifteen minutes it takes to check the flashing above the window.
The percentage of affected surface area and probe depth are practical thresholds commonly used by contractors and inspectors, which means a homeowner with a screwdriver and a tape measure can make a genuinely informed call, not just a guess. Where the reader should focus first isn’t the repair method at all. It’s confirming the water path is closed. Everything after that, patch, epoxy, splice, or full sill swap, only holds if that first step actually happened.
— Artem
Get a Free Estimate From Star Windows Solutions
If your rot is shallow, dry, and confined to a small patch, the epoxy method covered above will likely hold for years. Star Windows Solutions offers free estimates on rot repair and replacement across the Kansas City area, with financing options available for larger jobs.

An estimate costs you nothing and gives you a second, trained set of eyes on the damage before you decide whether to reach for a chisel or hand it off. If the frame itself has gone past the point of a splice repair, some professional providers also handle full window replacement with attention to proper flashing and sealing, aiming to prevent recurrence of the water problems that caused the rot originally. Reach out for a quote and find out which side of that decision your window actually falls on.
Sources
- How to Repair a Rotten Windowsill — This Old House
- Rehabilitation measure guideline — Building Science Corporation
- Repairing a rotted window sash — Structure Tech
FAQ
How Do You Fix Rotted Wood Around a Window?
Remove all soft, crumbling wood down to solid material, let the area dry fully, then saturate it with a liquid wood consolidant and rebuild the shape with two-part structural epoxy putty. For damage beyond 10% of the sill’s surface, splice repair or replacement usually works better than patching in place.
How Do You Remove Mold From Wood Around Windows?
Scrub light surface mold with a stiff brush and a mild detergent solution, then let the wood dry completely before sealing or painting. Heavy mold growth inside a wall cavity or spreading beyond the surface calls for a mold remediation specialist rather than a DIY scrub.
Can I Use Wood Filler or Spray Foam Instead of Epoxy?
No. Standard wood filler and spray foam trap moisture against the wood and lack the strength to bear structural load, which often makes rot worse. Two-part structural epoxy is the industry-standard fix because it bonds into the wood fibers without shrinking.
Is Wood Rot Around Windows Always a Sign of a Bigger Problem?
Not always, but it always points to a water intrusion issue somewhere, whether that’s failed flashing, cracked glazing putty, or clogged gutters. Fixing the wood without fixing the water source almost always means the rot comes back.