
Tempered glass shatters into thousands of small, blunt granular fragments because it releases stored internal stress the instant its surface is breached. The shape of that release tells the story. A figure-eight or butterfly mirror points to a nickel sulfide inclusion. A tight starburst with radial legs points to a sharp point impact. Concentric rings suggest thermal stress, and cracks that radiate from the pane’s edge almost always trace back to edge damage or a binding frame.
TL;DR:
- Properly tempered glass typically breaks into small, blunt cubes, often with a dice pattern indicating full internal tension and proper tempering.
- Impact from a small, concentrated force causes starburst patterns with short radial cracks, usually originating near the point of impact or from edge damage.
- Butterfly or figure-eight patterns suggest nickel sulfide inclusions, especially if originating from the pane’s interior away from impacts or edges.
- Thermal stress fractures produce concentric or spiderweb crack patterns, often linked to shading, sun exposure, or repeated impacts at the same spot.
- Failures caused by edge damage or improper mounting tend to display cracks radiating inward from edge chips or binding frames, often in combination with other stress indicators.
Table of Contents
- Why Tempered Glass Break Patterns Look the Way They Do
- The Main Tempered Glass Break Patterns and How to Read Them
- Matching the Break Pattern to Its Cause
- The Forensic Checklist: How Investigators Analyze a Broken Pane
- Preventing Spontaneous and Conditional Tempered Glass Failures
- What to Do Immediately After Tempered Glass Shatters
- A Glazing Crew’s View on Why Tempered Glass Really Fails
- Sources
- FAQ
Why Tempered Glass Break Patterns Look the Way They Do
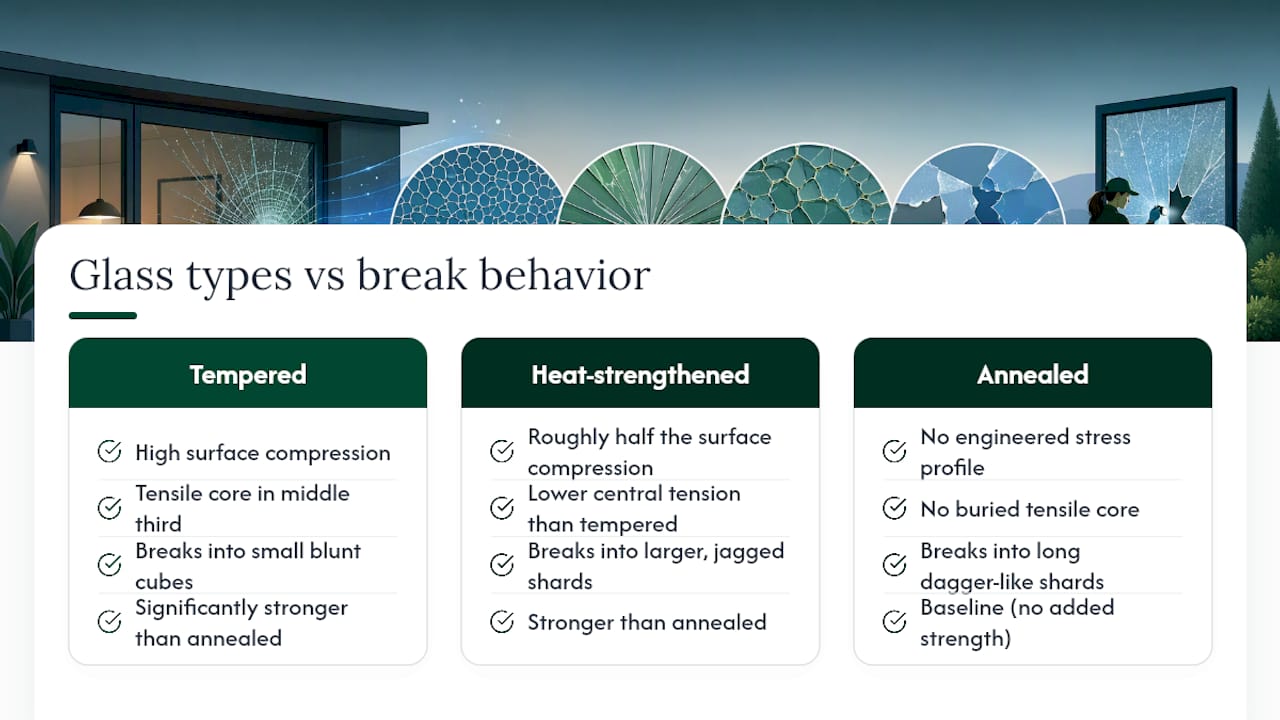
Tempering is a controlled contradiction: heat the glass to roughly 620 degrees Celsius, then blast it with cold air fast enough that the outer surfaces freeze solid while the core is still hot and fluid. As the interior cools and tries to shrink, the already-rigid skin won’t let it. The result is a glass sheet locked in permanent internal conflict: high compressive stress on both faces, balanced by tensile stress buried in the middle third of the pane.
That balance is what makes tempered glass significantly stronger than annealed glass of the same thickness against blunt impact. It’s also exactly why the break pattern looks nothing like a cracked windshield’s radial spiderweb held together by lamination. Nick through the surface compression layer at any point, even a tiny defect at an edge, and the crack front hits that buried tensile core and accelerates through the whole sheet almost instantly. According to AGC’s technical note on tempered glass breakage, that dicing failure into small, relatively blunt cubes isn’t a defect. It’s the glass doing exactly what it was engineered to do, trading one big dangerous shard for hundreds of small ones.
Fractography research on thermally strengthened glass shows that the level of central tension controls how violently the pane fragments. Small increases in that internal tensile stress produce a disproportionate jump in fragment count, per the semantic scholar analysis of tempering and fracture mechanics. Push the tension high enough, as full temper specifications require, and you get the classic dice pattern. Dial it back, and you get something else entirely.
That “something else” is heat-strengthened glass, which is cooled more slowly during manufacturing and ends up with roughly half the surface compression of full temper. It’s still stronger than annealed glass, but it fails into larger, more jagged shards rather than fine dice, according to Guardian Glass’s comparison of heat-strengthened and tempered products. Annealed glass, with no engineered stress profile at all, breaks into long dagger-like shards that stay largely intact, the pattern most people picture when they imagine a broken window, and precisely what building codes require tempered glass to avoid in doors, shower enclosures, and other hazard locations.
One practical consequence of all this stored energy: tempered glass cannot be cut, drilled, or edge-worked after tempering. Any attempt to alter the pane after the quench step risks triggering the exact catastrophic release the process is designed to survive under normal use. Every cut, hole, and edge profile has to happen before the glass goes into the furnace. That single manufacturing rule explains a surprising share of the field failures glaziers see: someone drills a hole for a lock or forces a pane into an undersized frame after the fact, and the glass eventually pays for it.
The Main Tempered Glass Break Patterns and How to Read Them
Every fracture leaves a signature. Learning to read it is the core skill behind analyzing glass breakage instead of just guessing at what happened.
Dice or granular pattern. This is the baseline signature of properly tempered glass doing its job. Fragments run small, roughly cube-shaped, and relatively blunt-edged, typically ranging from pea-sized down to smaller granules depending on glass thickness and how much of the stored energy the break released. If you see this pattern across the entire pane with no obvious concentration point, the glass tempered correctly and failed from a general overload rather than one isolated defect.
Starburst or radial pattern. Look for a tight cluster of short, straight cracks radiating outward from a single point, sometimes with a small crater or pit right at the center. This is the fingerprint of a concentrated point impact, a thrown rock, a hammer strike, a dropped tool. The fracture lines are usually denser and shorter near the origin and lengthen as they move outward, because the impact energy dissipates as the crack front travels.
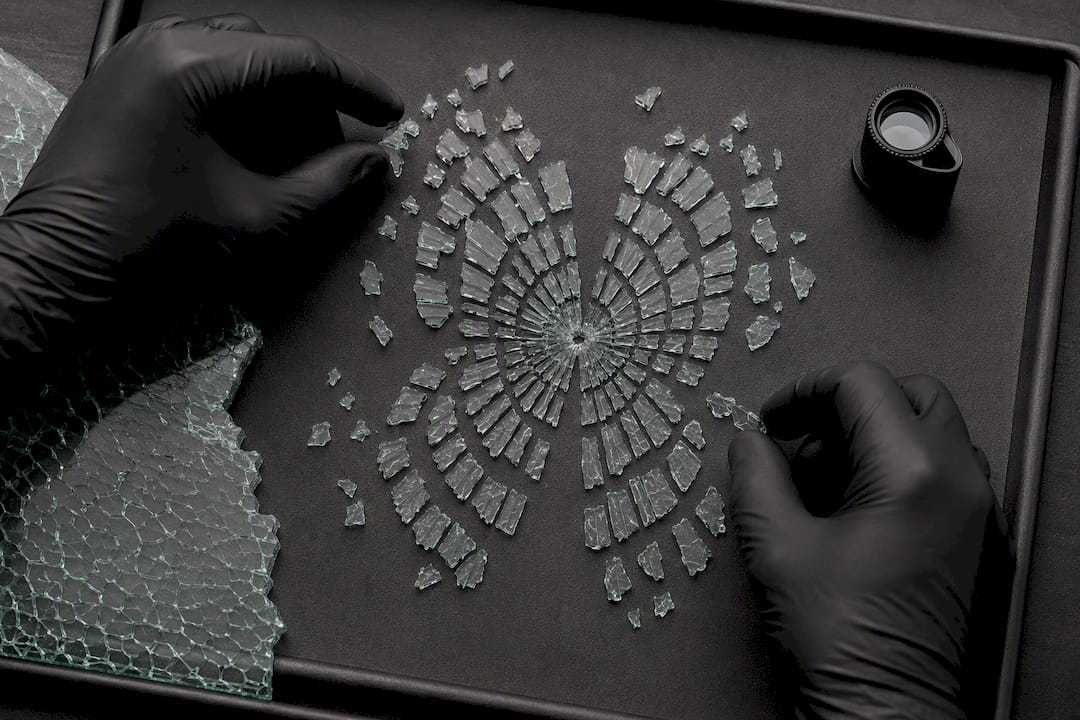
Figure-eight or butterfly pattern. This is the pattern every forensic glazier learns to spot immediately. Two roughly symmetrical, wing-shaped fracture zones meet at a small central point, forming a shape that genuinely resembles a butterfly or a sideways figure eight. That center point is the mirror, the smooth, glassy zone that marks exactly where the fracture began. A butterfly mirror sitting well away from any edge or visible impact point is close to a diagnostic slam dunk for a nickel sulfide inclusion, a manufacturing flaw discussed in more detail below.
Spiderweb or concentric pattern. Cracks form overlapping rings or web-like loops rather than clean radial spokes. This pattern tends to show up with thermal stress fractures, especially where one part of the pane sits in shade or behind a frame while an adjacent section bakes in direct sun, or after repeated, lower-energy impacts at roughly the same spot (a door that gets bumped by a cart in the same corner day after day, for instance).
Edge-origin radiating cracks. The fracture starts right at or within a few millimeters of the pane’s edge, with cracks fanning inward across the glass. This is the signature of edge damage: a chip from rough handling, a nick from an installer’s tool, or stress concentrated by a frame that’s binding the glass too tightly.
Fractography adds another layer of detail once you’re close enough to examine the actual broken surface, not just the overall pattern.
- Mirror zone: the smooth, almost polished patch right at the fracture origin, formed while the crack was still moving slowly.
- Mist: a slightly roughened halo just beyond the mirror, marking the transition to faster crack growth.
- Hackle: the coarse, ridged texture further out, where the crack was moving fastest and branching most aggressively.
- Wake and rim marks: fine striations that trail behind the origin point, useful for confirming crack direction when the mirror itself is damaged or hard to isolate.
Mirror radius isn’t just a visual clue. Fracture mechanics researchers have developed quantitative relationships between how large that smooth mirror zone is and how much stress was present at the moment of failure, which is one of the more powerful tools available for analyzing glass breakage after the fact. A larger mirror generally indicates the crack was moving slower at onset, which correlates with lower fracture stress, useful information when trying to distinguish a low-energy spontaneous release from a high-energy impact.
Matching the Break Pattern to Its Cause
Reading a fracture pattern is really an exercise in elimination. Each cause leaves a fairly distinct signature, and cross-checking the pattern against the location, timing, and glass history narrows the list fast.
- Nickel sulfide inclusions. NiS particles get trapped in the glass melt during manufacturing and undergo a slow phase change afterward, expanding in volume over months or years. Once that microscopic expansion generates enough local stress, it triggers spontaneous fracture with no external impact at all. The telltale sign is a figure-eight mirror pattern originating from a point well inside the pane, often near the center third where tensile stress runs highest, according to the Wikipedia entry on tempered glass. SGH’s technical review of spontaneous fracture notes that inclusion size interacts with glass thickness and mounting restraint in a nonlinear way. Even a sub-critical inclusion, one too small to fail on its own, can still trigger a break if extra tensile load from thermal shock or frame binding pushes it over the edge, per SGH’s 2025 analysis.
- Thermal stress. Partial shading from an awning, a parked truck, or an interior blind creates a sharp temperature gradient across the pane. Coated low-e glass and certain insulated unit configurations make this worse by absorbing more solar energy at the edges hidden behind the frame. The resulting fracture tends toward spiderweb or concentric patterns, and origin points often sit near the shade line rather than dead center.
- Edge damage and handling nicks. A chip from a forklift, a scrape during transport, or a careless cut during frame installation compromises the surface compression layer right where the glass can least afford it. Cracks radiate inward from that edge point, and the damage itself is often visible under magnification even before the pane fails. This is one of the more preventable causes on this list, and Construction Specifier’s rundown of spontaneous breakage flags installer handling as a recurring contributor alongside NiS and thermal stress.
- Point impact. A rock, a stray baseball, a dropped tool. The signature is a starburst with a visible crater or divot at the origin and short, dense radial cracks that lengthen outward. Impact origin points are almost never centered; they show up wherever the object actually struck, which is often near an edge or corner.
- Mounting restraint and frame binding. Glass installed too tightly in its frame, without room to expand under thermal cycling, develops stress fractures at multiple contact points rather than one clean origin. Inspect the setting blocks and gasket contact points first. This cause frequently overlaps with edge damage, since a binding frame concentrates load exactly where the edge is most vulnerable.
- Manufacturing defects other than NiS. Air bubbles, unmelted sand particles, and microcracks introduced during the tempering quench itself can all create localized weak points. These tend to produce smaller, less symmetrical mirror zones than a classic NiS butterfly and often require lab analysis to confirm.
The Forensic Checklist: How Investigators Analyze a Broken Pane
Before anyone touches a shattered lite for analysis, safety and documentation come first, in that order. Clear the area of loose fragments, wear cut-resistant gloves, and photograph everything in place before moving a single piece.
- Shoot wide shots of the whole opening, then close-ups of every fragment cluster, with a scale reference (a coin or tape measure) in frame.
- Label fragments by rough position relative to the frame before bagging them, since reassembly depends on knowing roughly where each piece came from.
- Note ambient conditions: recent weather, direct sun exposure, HVAC vents nearby, and any recent impact events like storms, delivery trucks, or construction work.
- Preserve the frame and any hardware in place. Frame binding evidence disappears fast once someone “fixes” the opening.
The actual fractography checklist runs through four questions in order: where is the origin, how large is the mirror zone, which direction does the hackle radiate, and are there wake or rim marks confirming that direction independently? Answering all four consistently is what separates a credible conclusion from a guess.
Fragment reassembly matters most when a butterfly pattern is suspected. Piecing the fragments back together around the suspected origin point, even loosely, on a flat surface often reveals the classic figure-eight shape clearly enough to confirm NiS involvement without lab work. Chicago Window Expert’s field diagnostic guide recommends this reassembly step specifically before deciding whether lab analysis is worth the cost.
When the visual evidence is inconclusive or the stakes justify it, such as litigation, warranty disputes, or repeat failures in the same building, scanning electron microscopy with energy dispersive spectroscopy (SEM/EDS) can positively identify a nickel sulfide particle at the fracture origin. This is the only method that turns “probably NiS” into a confirmed finding, since it directly detects the chemical signature of the inclusion rather than inferring it from geometry alone.
Pro Tip: Never rely on visual pattern-matching alone in a report intended for insurance or litigation. Photograph the mirror zone at multiple angles under raking light, since that low-angle lighting makes mirror boundaries and hackle direction far easier to read than a flat, straight-on shot.
Visual fractography is powerful, but it has real limits. It can strongly suggest a cause and narrow the field to one or two likely mechanisms, yet it rarely proves anything with the same certainty as a lab test. Present conclusions with that distinction intact: “consistent with NiS inclusion” reads very differently, and more honestly, than “caused by NiS inclusion” when no SEM/EDS analysis backs it up.
Preventing Spontaneous and Conditional Tempered Glass Failures
Heat-soak testing is the single most effective quality control step available for catching NiS-prone panes before they ship. The process bakes finished tempered glass at roughly 290 degrees Celsius for several hours, deliberately accelerating the same phase change that would eventually cause a field failure. Panes with critical inclusions typically fail right there in the chamber instead of on a building years later. Guardian Glass notes that the European EN 14179 standard governs this process, and while heat-soaking meaningfully reduces field breakage risk, it doesn’t eliminate it entirely. Some inclusions still sit below the threshold the test can catch.
That’s a strong argument for matching glass type to actual risk, not just cost, when specifying a project.
- Specify heat-soaked tempered glass for overhead glazing, curtainwall, and any application where a spontaneous failure would drop glass on people below.
- Consider heat-strengthened glass instead of full temper in applications where code doesn’t mandate safety glazing but wind load or thermal stress is still a concern; it carries a lower NiS-driven failure rate.
- Specify laminated glass, tempered or otherwise, anywhere fall-through protection matters, since the interlayer holds fragments together even after fracture.
- Insist on clean-cut edges with no chips or nicks before installation, and confirm setting blocks and gaskets give the pane genuine room to expand and contract.
- Review shading and coating choices during design, since uneven solar heating across a single lite is a preventable, design-stage decision rather than a manufacturing defect.
Retail and display fixtures raise their own version of this risk. A full-glass showcase unit that positions large glass panels overhead or at eye level needs the same scrutiny on edge finishing and mounting restraint that a curtainwall does, just at a smaller scale.
Ongoing inspection closes the loop. Walk building glazing periodically looking for stress cracks starting at edges, frame sealant that’s cracked or missing, and any pane that’s developed a visible chip since the last check. Catching edge damage before it propagates is far cheaper than replacing a pane that’s already failed.
What to Do Immediately After Tempered Glass Shatters
- Clear people from the area first. Fragments scatter well beyond the frame, and anyone standing below overhead glazing at the moment of failure is at real risk from falling pieces. Keep foot traffic away until the opening is secured.
- Put on cut-resistant gloves and eye protection before touching anything. Tempered glass fragments are blunt compared to annealed shards, but edges and corners of the dice can still cut deep.
- Photograph everything before cleanup starts. Wide shots of the full opening, close-ups of fragment clusters, and anything unusual near the origin point, all before a broom touches the scene. This step matters even more if a warranty claim or investigation is possible.
- Contain and bag representative fragments rather than sweeping everything into the trash, especially any pieces from what looks like the origin area. If a temporary safety film or board-up is needed to secure the opening overnight, apply it after documentation, not before.
- Call your glazier with specifics, not just “the window broke.” Note when it happened, whether anyone heard a bang beforehand, recent weather or temperature swings, and whether the pane had any known chips or recent impacts. That context often shortens the diagnostic process considerably. For step-by-step guidance on securing a broken window before a technician arrives, follow the same documentation-first approach.
A Glazing Crew’s View on Why Tempered Glass Really Fails
Most spontaneous failures Star-ws crews get called out for in the field trace back to two things: a chip introduced during someone else’s installation years earlier, or a frame that’s binding a pane too tightly after a building settles. NiS inclusions get most of the attention in technical writing, and they’re real, but edge damage and mounting stress cause plenty of the “it just exploded” calls that turn out to have a very mundane origin once someone actually looks at the frame.
The most useful thing a homeowner or property manager can do is ask a potential installer direct questions before hiring: How do you protect edges during handling? Do you specify heat-soaked glass for overhead or high-risk applications? Will the frame allow for thermal expansion, or is this a tight fit? A contractor who answers those questions confidently, without hesitation, is usually the one worth trusting with the replacement.
If you’re dealing with a shattered pane right now, professional glass replacement that accounts for the actual cause, not just the hole in the wall, is what keeps the next pane from failing the same way. Star-ws serves homeowners, property managers, and contractors across the Kansas City area with free estimates and financing options for both emergency glass repair and planned replacement projects, including commercial storefront glass and specialty upgrades like laminated or bulletproof glazing for buildings that need it.
— Artem
Sources
- Thermally strengthened glass / tempering and fracture mechanics (semantic scholar PDF)
- Spontaneous glass breakage: why it happens and what to do about it – Construction Specifier
- Heat-treated glass : heat- strengthened or tempered glass? | Guardian Glass
- Tempered Glass Breakage (AGC technical note)
FAQ
What are the different types of glass break patterns?
The main tempered glass patterns are the dice or granular pattern, starburst or radial from point impact, figure-eight or butterfly from nickel sulfide inclusions, spiderweb or concentric from thermal stress, and edge-origin radiating cracks from edge damage or frame binding.
How likely is tempered glass to break?
Tempered glass is engineered to be far more resistant to blunt impact than annealed glass, and spontaneous failures from nickel sulfide inclusions are uncommon, though SGH’s 2025 review confirms the risk is low but non-zero and depends on inclusion size and mounting conditions.
What does it look like when tempered glass breaks?
Tempered glass typically shatters into hundreds or thousands of small, relatively blunt granular fragments across the whole pane, rather than the large jagged shards or spiderweb crack lines seen in annealed glass.
How hard do you have to hit tempered glass to break it?
There’s no single force threshold since it depends on where the impact lands, the glass thickness, and whether an edge or surface flaw is already present. A sharp point impact at a weak spot can trigger failure at far lower force than a broad, evenly distributed hit.