
Run a quick smoke or tissue test before you do anything else. Hold a lit incense stick or a thin strip of tissue near the window perimeter while the HVAC is off and interior doors are closed. If the smoke or tissue moves, you have an air leak — failed caulk, worn weatherstripping, or a gap at the frame. If it stays still but the glass feels cold, that’s convection off a poorly insulated pane, not an air leak, and the fix is completely different.
That single distinction saves most homeowners from wasting money on the wrong repair.
Pro Tip: The ENERGY STAR DIY guide ranks sealing and weatherstripping among the highest-return home upgrades you can do yourself. Mark every window that fails the smoke test with painter’s tape, then work through them by zone rather than jumping from room to room.
Once you know what you’re dealing with, the fix ladder looks like this:
- Moving smoke at the sash/frame seam: Replace weatherstripping (DIY).
- Moving smoke at the exterior perimeter: Re-caulk the frame-to-wall joint ($3–$20 per window, DIY).
- Cold glass, no moving air: Install interior storm film or an interior storm window ($10–$30 DIY) as a temporary measure; IGU replacement for a permanent fix.
- Soft or rotten frame, hardware that won’t latch, or three or more windows showing the same symptoms: Stop and call a professional.
Key Takeaways
Fixing drafty windows starts with one fast test: if smoke moves, you have an air leak; if the glass is just cold, you have a convection or IGU problem, and each requires a completely different repair.
| Point | Details |
|---|---|
| Diagnose before you fix | The smoke/tissue test tells you whether you need weatherstripping, caulk, or IGU replacement. |
| Cheapest fixes first | Weatherstripping ($3–$20/window) and re-caulking ($3–$20/window) resolve most air leaks permanently. |
| IGU failure needs glass work | Haze between panes won’t respond to sealing; glass-only IGU replacement runs $250–$700 per unit. |
| Call a pro for structural issues | Soft frames, failed hardware, or repeated IGU failures require professional inspection and repair. |
| Star-ws for Kansas City homes | Star Windows Solutions offers free estimates, targeted repairs, and full replacement with financing in the Kansas City area. |
Table of Contents
- Why windows become drafty: causes and warning signs
- How to find exactly where the draft is coming from
- Practical DIY fixes matched to each diagnosis
- What a fogged IGU actually means and your repair options
- When to call a professional and what to expect
- What Star Windows Solutions does for drafty windows in Kansas City
- Typical U.S. costs and timelines for common fixes
- Seasonal maintenance checklist to keep drafts from coming back
- The diagnosis step most homeowners skip
- Fix your drafty windows with Star Windows Solutions in Kansas City
- Sources
Why windows become drafty: causes and warning signs
Drafty windows rarely fail for just one reason. The most common culprits fall into five categories, and each one presents differently.
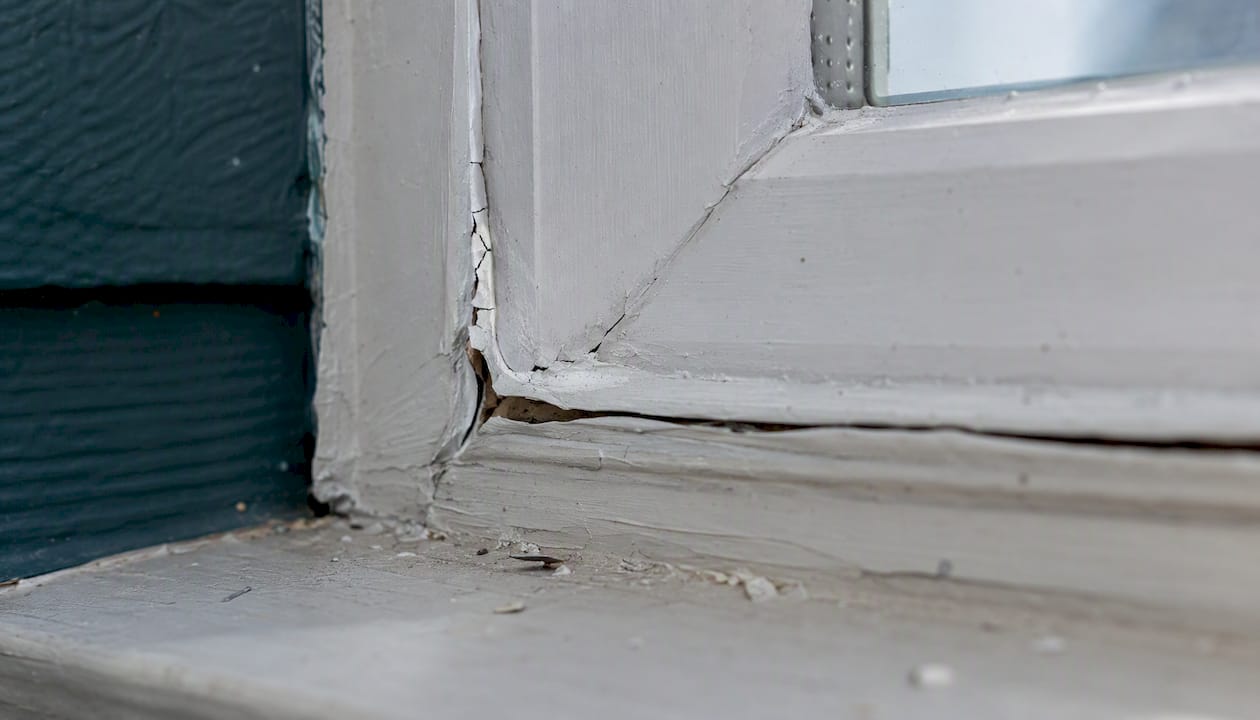
Failed exterior caulk is the most frequent cause. The bead between the window frame and the exterior wall shrinks, cracks, or pulls away over time, leaving a direct path for outside air. You’ll see a visible gap or crumbling material when you look closely at the perimeter from outside.
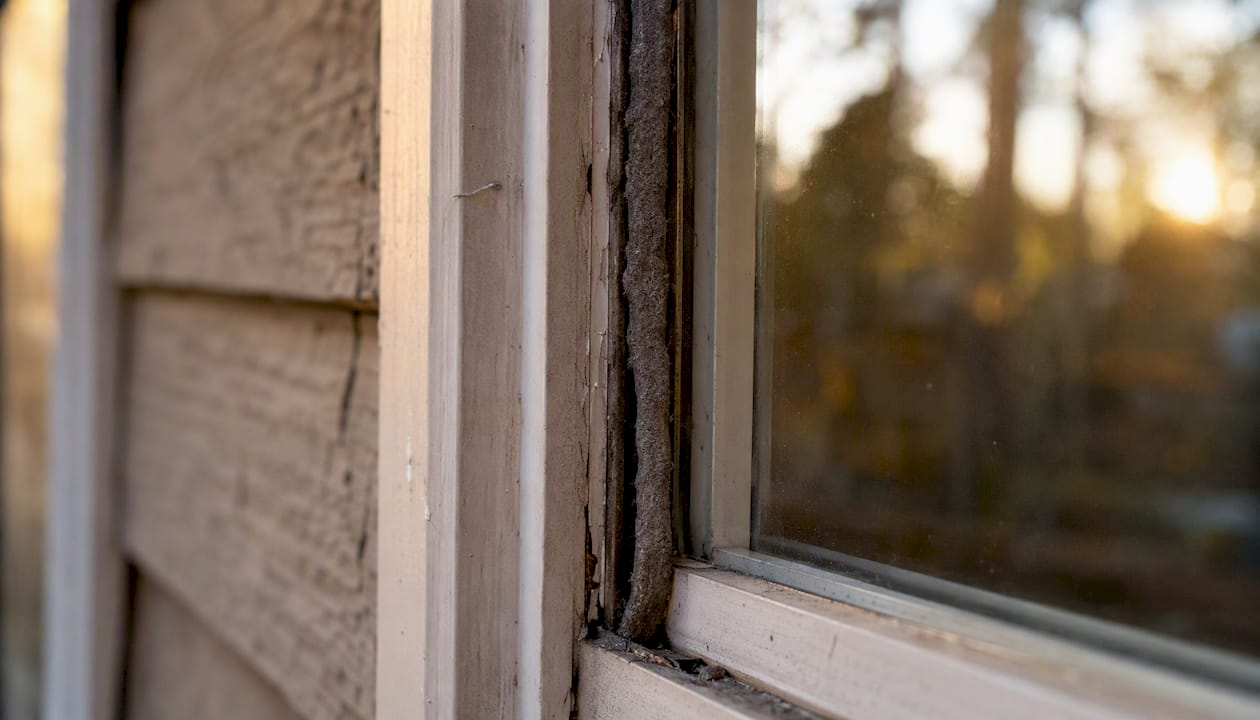
Worn weatherstripping creates leaks at the sash-to-frame contact line — the moving part of the window. Pile weatherstripping (the fuzzy kind on double-hung sashes) compresses and loses its seal after years of use. Foam and bulb types crack or flatten. The symptom is air movement right at the sash edge, not the outer frame.
Failed insulated glass units (IGUs) show up as permanent haze, condensation, or streaking between the panes — not on the surface. That moisture means the inert gas fill has escaped and the seal has broken. The glass itself becomes a poor insulator, and you’ll feel radiant cold even with no air movement.
Warped or rotten frames prevent the sash from closing fully. A window that won’t latch or sits visibly crooked in its frame is a structural problem, not a sealing problem. Caulk and weatherstripping won’t hold if the frame itself has shifted.
Convection off cold glass gets misread as a draft constantly. Single-pane glass and older double-pane units with degraded low-e coatings radiate cold into the room, creating a downward air current that feels like a breeze. The tissue test stays still; the glass surface is simply cold.
According to Acrewindows, reconciling convection from true air infiltration is the step most homeowners skip, which leads them to re-caulk a window that actually needs an IGU replacement.
Quick symptom scan:
- Smoke or tissue moves near the frame perimeter → failed exterior caulk
- Smoke moves at the sash edge → worn weatherstripping
- Haze or moisture between panes → failed IGU
- Window won’t close or latch fully → warped frame or hardware failure
- Cold sensation, no air movement → convection/radiant cold or poor glazing
Pro Tip: Run the smoke test on a cold, windy day with the heat running. Pressure differences are larger then, and small leaks that hide on calm days become obvious.
How to find exactly where the draft is coming from
Accurate diagnosis takes about 20 minutes and a few items you probably already own.
Tools you need:
- Incense stick or thin candle (smoke source)
- Single sheet of tissue paper
- Flashlight
- Flathead screwdriver (for checking frame firmness)
- Infrared thermometer or thermal camera (optional but useful)
Step-by-step diagnostic sequence:
- Prepare the space. Close all interior doors, turn off the HVAC, and seal any fireplace dampers. You want the house as neutral as possible so pressure differences at the window are readable.
- Test the exterior perimeter. Hold the incense stick 1–2 inches from the joint where the window frame meets the wall, moving slowly around all four sides. Watch for smoke deflection.
- Test the sash-to-frame seam. Move the smoke source along the edge where the operable sash meets the fixed frame. This is where weatherstripping lives.
- Test the glass surface. Hold your palm 2–3 inches from the glass without touching it. Persistent cold with no smoke movement points to convection or a failed IGU.
- Check for condensation between panes. Look at the glass in direct light. Haze or moisture that can’t be wiped away confirms a failed seal.
- Test the sash operation. Try to close and lock the window fully. A sash that won’t seat properly or a latch that doesn’t engage means the frame or hardware needs attention before any sealing will work.
- Document and tag. Mark each failing window with painter’s tape and note the failure type: perimeter leak, sash leak, cold glass, or structural.
If you find air movement in multiple zones or can’t isolate the source, a professional blower-door test pressurizes the entire house and maps every leak simultaneously. A home energy audit through your utility company often includes this at low or no cost.
Pro Tip: A $20–$50 infrared thermometer lets you scan the glass surface and frame quickly. A cold spot on the frame itself, not just the glass, usually means a gap behind the trim where insulation is missing — a separate fix covered by ENERGY STAR’s trim-sealing guidance.
Practical DIY fixes matched to each diagnosis
Work from cheapest and fastest to most involved. Most air leaks resolve with weatherstripping or caulk; convection problems need a different approach entirely.

Replacing weatherstripping (sash leaks)
Materials: V-strip (tension seal), foam tape, or pile weatherstripping depending on window type. V-strip is the most durable for double-hung windows.
- Open the sash and peel or pry out the old weatherstripping completely.
- Clean the channel with a dry cloth. Remove any adhesive residue.
- Cut V-strip to length and press it into the channel with the open side of the V facing out toward the exterior.
- Close the sash and check for resistance. You should feel slight compression.
Re-caulking the exterior perimeter (frame-to-wall gaps)
For gaps wider than 1/4 inch, use a foam backer rod first. Colfax Glass recommends silicone for exterior work because it stays flexible through freeze-thaw cycles. Cost: $3–$20 per window joint.
- Scrape out all old, cracked caulk with a putty knife or oscillating tool.
- Clean the joint with a dry brush and let it dry completely.
- For gaps over 1/4 inch, press backer rod into the gap first. Per ENERGY STAR’s sealing guidance, use non-expanding foam or backer rod for window perimeters, and avoid overstuffing, which can bow the frame.
- Apply a smooth, continuous bead of caulk and tool it flat with a wet finger.
- Never caulk weep holes. Those small slots at the bottom of the exterior frame are drainage channels; sealing them traps water and causes rot.
Interior storm film (convection/cold glass)
Materials: Shrink-film window insulation kit (3M, Duck Brand). Cost: $10–$30 per window.
- Clean the window frame thoroughly.
- Apply double-sided tape around the interior frame perimeter.
- Press the film onto the tape, leaving it slightly loose.
- Use a hair dryer to shrink the film taut. Wrinkles disappear as it heats.
This is a seasonal fix, not a permanent one. It reduces convection noticeably but doesn’t address a failed IGU or structural gap.
DIY cost and fix summary:
The ENERGY STAR DIY guide notes that sealing and weatherstripping consistently rank among the highest-return improvements homeowners can make to reduce heating and cooling costs.
Stop and call a pro when: the frame feels soft or spongy under the screwdriver, the sash won’t close regardless of weatherstripping, hardware is broken or missing, or three or more windows in the same room show the same symptoms.
What a fogged IGU actually means and your repair options
Moisture or haze permanently trapped between the panes means the IGU’s perimeter seal has failed. The inert gas fill (argon or krypton) has escaped, and outside air with humidity has entered the cavity. No amount of caulking or weatherstripping fixes this — the glass unit itself needs attention.
How to confirm it’s the IGU and not surface condensation:
- Wipe the interior glass surface. If the haze remains, it’s between the panes.
- Look for mineral deposits or streaking that shifts with light angle — a classic sign of long-term moisture inside the unit.
- Check whether the fogging is consistent across the pane or concentrated near the edges (edge fogging appears first as the seal starts to fail).
Repair vs. replacement:
A glass-only IGU replacement swaps out the sealed glass unit while keeping the existing sash and frame. This works well when the frame is structurally sound and the window style is still available. Typical cost runs $250–$700 per unit depending on size and glass type.
Full window replacement makes more economic sense when the frame is warped or rotten, the sash hardware has failed, the window style is discontinued, or multiple units in the same room have failed. At that point, you’re paying for labor twice if you do glass-only first.
Pro Tip: A single fogged IGU in an otherwise sound window is almost always worth a glass-only replacement. Three fogged units in the same room, especially in an older home, usually signals that the entire window generation is at end of life — plan for full replacement by zone rather than unit by unit.
When to call a professional and what to expect
Some window problems are genuinely beyond DIY. Knowing the line saves you from a repair that fails in six months.
Red flags that require a pro:
- Frame feels soft, spongy, or shows visible rot when probed with a screwdriver
- Sash won’t close or lock regardless of weatherstripping adjustments
- Water stains on the interior sill or wall below the window
- Weep holes are blocked and water is pooling in the frame track
- Repeated IGU failures in the same window (seal fails again within 2–3 years of replacement)
- Large or hard-to-access windows (second story, oversized units)
What a qualified installer will inspect:
- Smoke or thermal testing to confirm air infiltration points
- Frame integrity check (probe for rot, check for warping and square)
- Sash operation and hardware function
- IGU condition (haze, seal failure, glass damage)
- Flashing and drainage assessment at the exterior perimeter
- Measurement of rough opening for replacement sizing
Questions to ask before signing anything:
- What exactly is in scope — glass only, sash, or full unit?
- What brand and IGU specifications are you installing?
- What is the lead time for the glass or window unit?
- What warranty covers the IGU seal, and what covers the installation labor?
- Will you handle disposal of the old unit?
- Are you licensed and insured in this state?
Common pro repairs and what they involve:
- Re-glazing: Replacing the glazing compound or tape that holds glass in older single-pane frames. Typically same-day.
- IGU replacement: Ordering a new sealed unit to spec, removing the sash, pressing in the new glass, and reinstalling. Usually 1–7 days once the unit arrives.
- Frame and rot repair: Removing deteriorated wood, treating for moisture, and rebuilding with epoxy filler or new lumber. Complexity varies widely.
- Hardware replacement: New locks, operators, and balances. Often same-day. Window and door hardware failures are a common cause of sashes that won’t seat properly.
- Full unit replacement: Removing the existing window to the rough opening, installing a new unit with proper flashing, and finishing interior and exterior trim.
Pro Tip: Ask specifically whether the contractor will check and clear the weep holes during the job. Blocked weep holes are a leading cause of water intrusion that gets misdiagnosed as a frame leak.
What Star Windows Solutions does for drafty windows in Kansas City
Star Windows Solutions handles the full range of window-related air and energy problems for homeowners and property managers in the Kansas City area. The workflow starts with an on-site inspection that includes smoke and thermal testing, frame integrity assessment, sash operation checks, and IGU evaluation — the same diagnostic sequence described earlier in this guide, performed by a trained installer rather than a homeowner with an incense stick.
From that inspection, the team produces a written estimate covering targeted repairs (weatherstripping, caulk, IGU replacement, frame and sill rot repair) or full unit replacement when the frame or sash is beyond repair. Free estimates and financing options are available, which matters when a zone of windows needs replacement at once rather than one unit at a time.
What homeowners can expect from the process:
- Inspection and written estimate (typically within a few days of contact)
- Clear scope: repair vs. replacement recommendation with reasoning
- Production and lead time communicated upfront (IGU orders typically 2–6 weeks; in-stock units faster)
- Installation with proper flashing, drainage, and trim finish
- Warranty coverage on both materials and installation labor
Typical U.S. costs and timelines for common fixes
Budgeting for window work is easier when you separate the repair categories. DIY fixes are inexpensive and fast; professional work costs more but covers structural problems that DIY can’t touch.
The DOE estimates that sealing and weatherstripping can reduce energy costs by 10–20% annually in homes with significant air leakage. That payback timeline is measured in months for a $20 weatherstripping job, not years. Full window replacement pays back over a longer horizon but adds home value and qualifies for energy-efficiency incentives in many cases.
For readers weighing repair against replacement, this cost comparison breaks down the scenarios where repair holds up economically versus when replacement is the smarter long-term spend.
Seasonal maintenance checklist to keep drafts from coming back
Most draft problems are preventable with one annual inspection and a few targeted tasks timed to the seasons.
Spring (after last freeze):
- Inspect all exterior caulk joints for cracking, shrinkage, or separation. Touch up or replace any compromised sections before summer humidity sets in.
- Test sash operation on every operable window. Lubricate hardware with a silicone-based spray.
- Clear and test weep holes. Run water along the exterior sill and confirm it drains through the weep slots, not into the frame track.
- Check for condensation between panes on all IGUs. Early-stage fogging is easier and cheaper to address before it worsens.
Late summer/early fall (before heating season):
- Replace any weatherstripping that shows compression, cracking, or gaps. This is the highest-return task before winter.
- Re-inspect exterior caulk after summer heat cycles, which accelerate shrinkage.
- Check all window locks and latches. A latch that doesn’t fully engage leaves a gap at the sash seam even with new weatherstripping.
- Document any windows with persistent condensation, soft frames, or hardware issues. Schedule professional assessment before the heating season peaks.
After heavy rain events:
- Check interior sills for moisture. Water on the sill after rain means flashing or drainage has failed, not just a caulk gap.
- Confirm weep holes are clear again (debris accumulates quickly).
Pro Tip: Keep a simple log — a note on your phone works — of which windows you repaired, what materials you used, and when. Weatherstripping and caulk have finite lifespans. Knowing when you last replaced them tells you when to check again rather than waiting for a draft to reappear.
The diagnosis step most homeowners skip
Most drafty-window advice online jumps straight to caulk. Buy a tube, run a bead, done. The problem is that caulk fixes exactly one failure mode: a gap between the frame and the wall. It does nothing for worn weatherstripping, a failed IGU, or a warped frame, and it actively makes things worse if you seal a window that has a moisture problem behind the trim.
The tissue test takes two minutes. Skipping it means you might spend a Saturday re-caulking windows that need weatherstripping, or replacing weatherstripping on a window that actually needs a new IGU. That’s not a small mistake — it’s the difference between a $15 fix and a $500 one, or between a repair that holds for a decade and one that fails again next winter.
There’s also a tendency to treat every window in the house as the same problem. They’re not. A north-facing double-hung in an older home might have three separate failure modes: cracked exterior caulk, compressed pile weatherstripping, and a fogged IGU on the lower sash. Each one needs its own fix. Treating them as a single “drafty window” problem leads to the same incomplete repair cycle most homeowners are already stuck in.
The other piece of conventional advice that falls short is the “replace everything” recommendation. Full replacement is the right call when frames are rotten, hardware has failed, or a whole zone of windows is at end of life. But a sound frame with a failed IGU is a glass replacement job, not a window replacement job, and the cost difference is significant. Knowing which one you actually have is the only way to spend the right amount of money.
Fix your drafty windows with Star Windows Solutions in Kansas City
Cold air around windows is a solvable problem, and most of the time the fix is faster and cheaper than homeowners expect. Star Windows Solutions gives Kansas City homeowners a single point of contact for the full repair-to-replacement range: on-site smoke and thermal diagnostics, weatherstripping and caulk repairs, IGU and glass replacement, frame rot repair, and full window replacement when the frame or sash is past saving.

The process starts with a free estimate. An installer visits, runs the same diagnostic sequence this guide describes, and gives you a written scope with clear pricing before any work begins. Financing is available for larger jobs, so a zone of failing windows doesn’t have to wait until you’ve saved the full amount. If you’re in the Kansas City area and ready to stop guessing at the source of your drafts, contact Star Windows Solutions to schedule your free inspection.
Sources
These resources back the guidance in this article and are worth bookmarking for your own reference.
- ENERGY STAR do-it-yourself guide