
Most homeowners can replace a door threshold in an afternoon with basic tools. But before you buy a replacement, poke the subsill with a screwdriver first. If it sinks in soft or crumbly, stop and treat that as a rot repair, not a swap. Try an adjustable threshold tweak or a new seal insert before you tear anything out.
TL;DR:
- Conduct the pick test at multiple points along the subsill to accurately assess rot and determine whether frame repair is necessary.
- Use adjustable thresholds with a movable strip for sound wood but worn seals, rather than total replacement.
- Be aware that materials like composite and aluminum thresholds resist weather better than solid wood but may cost more upfront.
- Properly seal and shim the threshold during installation to prevent water infiltration and ensure a proper door swing.
- If the subsill shows soft or crumbly wood, a full frame repair may be needed, and professional inspection is highly recommended.
Table of Contents
- Repair or Full Replacement? Run This Checklist First
- Wood, Aluminum, or Composite: Which Threshold Should You Buy?
- Tools and Materials You’ll Need Before You Start
- How Do You Remove and Install a New Door Threshold?
- How Do You Measure a Door Threshold for Replacement?
- What Does a Threshold Replacement Actually Cost and Take?
- Why Is My Door Still Drafty or Rubbing After Replacement?
- When a Threshold Job Turns Into a Structural Repair
- Where Most DIY Threshold Guides Get It Wrong
- Getting a Free Estimate From Star-ws
- Sources
Repair or Full Replacement? Run This Checklist First
Before you buy anything, spend five minutes diagnosing what you’re actually dealing with. The screwdriver, or “pick,” test tells you almost everything.
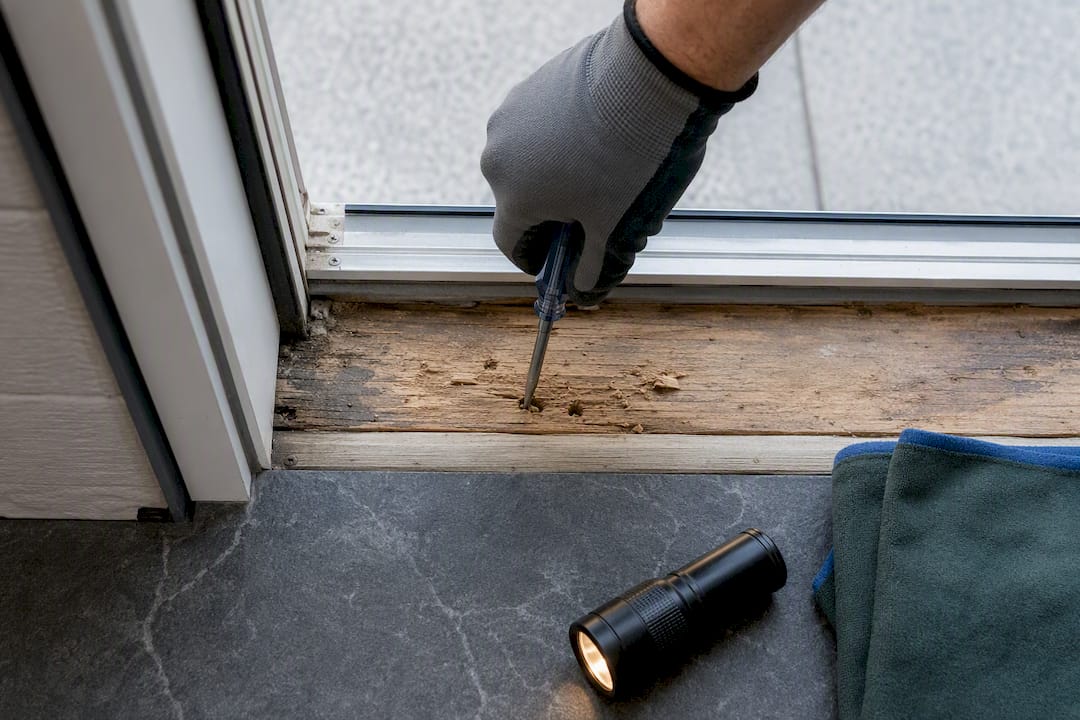
- Pick test: Press a screwdriver or awl into the wood at the base of the door jamb and under the threshold. If it meets firm resistance, you’re fine. If it sinks in with little pressure, the subsill fibers have broken down from water damage and need repair before anything else happens.
- Draft or worn seal only: If the wood is solid but you feel air or see daylight under the door, check whether the threshold is adjustable. Turning the screws along the top raises the seal and often solves the problem in minutes.
- Cracked, warped, or rotted threshold with a solid subsill: This is your standard full replacement job, and it’s very doable yourself.
- Red flags for calling a pro: soft or crumbling wood past the pick test, water stains climbing the door jamb, or a sill that flexes when you step on it near the threshold.
Pro Tip: Do the pick test in at least three spots along the sill, not just the center. Rot often starts at the corners, closest to where water pools against the jamb.
Wood, Aluminum, or Composite: Which Threshold Should You Buy?
Threshold material matters more than most people assume, especially on exterior doors that take direct weather. Here’s how the common options stack up:
- Solid wood: Cheapest and easiest to match to existing trim, but it absorbs moisture and rots faster than other options. Laminated or engineered wood resists movement and weathering far better than a single piece of solid stock, so choose that over raw lumber if wood is your pick.
- Aluminum: Durable, low maintenance, and common on modern exterior doors, though it can feel cold underfoot and dent if struck hard.
- Composite: Resists rot and warping completely, holds paint or stain well, and costs more upfront than wood.
- Adjustable thresholds: Built with a movable center strip so you can raise or lower the seal without removing anything. These are the right call when the wood itself is sound but the seal has worn down.
Skip the rubber weatherstrip insert if you can avoid it. Rubber inserts clog with debris and degrade faster than a clean seal setup, so most pros now pair a low-profile smooth-top threshold with a separate door sweep instead. It’s a more reliable combination and easier to replace piece by piece later.
Tools and Materials You’ll Need Before You Start
Gather everything before you pull the old threshold, since an exposed doorway during a parts run invites weather and pests inside.
Tools: a pry bar, utility knife, hammer, drill/driver, tape measure, hacksaw or oscillating multi tool for cutting the threshold to length, and a screwdriver or awl for the pick test.
Materials: the replacement threshold, corrosion-resistant fasteners (galvanized or stainless screws hold up far better than standard steel in a wet doorway), exterior-grade silicone or polyurethane sealant, and self-adhering flashing membrane if the subsill needs protection.
Lay down a drop cloth or cardboard to protect flooring near the doorway, and if you have to leave the opening exposed overnight, tape plastic sheeting over it. A basic window installation tool checklist covers most of the same core tools if you’re building out a kit from scratch.
How Do You Remove and Install a New Door Threshold?
Work through these steps in order, and don’t skip the subsill inspection even if the old threshold looks like the only problem.
- Cut the old threshold into three sections. Score it with a utility knife, then cut through the center with a hacksaw or multi tool. Removing the middle piece first releases lateral tension on the jambs, which makes the end pieces slide out without prying against the trim.
- Pry gently, working from the center out. Use a thin pry bar and a scrap block to protect the jamb finish. This is where most DIYers gouge their door casing, so go slow near the door stops.
- Run the pick test again across the exposed subsill. If the wood is sound, move forward. If it’s soft, you’re now looking at a framing repair, not a threshold swap, and that’s the point to consider bringing in help.
- Install flashing if the sill was ever exposed to standing water. A self-adhering membrane under the new threshold blocks water from migrating into the framing, and it’s cheap insurance against a repeat repair.
- Build a template. Trace the jamb contours and door stop profile onto a piece of hardboard, then use that template to mark the notches on your new threshold. This scribing method gets you a snug fit on the first cut instead of repeated trimming.
- Cut the notches and test-fit. Dry-fit the threshold before any fastener touches it. Trim in small increments; you can always take off more material, but you can’t add it back.
- Shim, fasten, and seal. Set the threshold, shim any gaps for a level fit, then drive corrosion-resistant screws. Run a bead of exterior sealant along the back and ends before final fastening to keep water from wicking underneath.
- Finish and check the door swing. Close the door fully and check for even contact along the sweep. Adjust screws on adjustable models until the seal meets the door without dragging.
A basic swap like this generally runs 1 to 3 hours from start to finish when the subsill is sound, and that window holds up well across most exterior door installations.
How Do You Measure a Door Threshold for Replacement?
Measure three dimensions before you buy anything: the length between the inside edges of the door casing, the width from the interior face to the exterior weather edge, and the thickness of the current threshold. There is no universal standard size for door thresholds, so plan on custom notching almost every time.
- Buy the threshold a bit long, then trim to fit rather than ordering exact and hoping.
- Match the profile (flat, beveled, or cap style) to your existing door sweep and weatherstripping so they seat correctly against each other.
- Choose rot-resistant materials for any door facing rain, sprinklers, or northern exposure with slow drying conditions.
- Check product listings for compatible door thickness ranges. Many adjustable models list a working range rather than one fixed size.
What Does a Threshold Replacement Actually Cost and Take?
A straightforward DIY swap on a sound subsill runs 1 to 3 hours, and materials for a basic wood or aluminum threshold typically land in the $30 to $80 range at most home centers. Composite and premium metal options cost more.
- Seal or insert repair only: under 30 minutes, often under $20 in parts.
- Full threshold swap, sound subsill: 1 to 3 hours, moderate material cost.
- Subsill rebuild required: can stretch to a full day, and professional labor plus lumber or a concrete patch pushes the cost well past a simple swap.
Hidden rot, tight jamb tolerances, and matching an unusual door profile are the three factors most likely to turn a quick weekend job into a longer one.
Why Is My Door Still Drafty or Rubbing After Replacement?
A few common issues show up right after installation, and most have quick fixes.
- Door drags on the new threshold: Adjust the screws on an adjustable threshold to lower the seal slightly, or check if a hinge screw has backed out and dropped the door.
- Persistent draft despite a new seal: Inspect the door sweep separately. A worn or mismatched sweep undermines even a perfect threshold installation.
- Leaking returns after a rain: This usually points back to missing flashing or a sealant bead that didn’t bond, not a bad threshold. Recheck the joint where the threshold meets the exterior sill.
Pro Tip: If the door still won’t latch cleanly after adjustment, check the strike plate alignment before you touch the threshold again. It’s a five-minute fix that gets blamed on the wrong part constantly.
When a Threshold Job Turns Into a Structural Repair
Most threshold swaps stay simple. The ones that don’t usually involve water that’s been sitting undetected for a season or more, and by the time you see daylight through the sill, the framing underneath has often been compromised for a while.
When the pick test reveals soft wood, the fix isn’t a new threshold. It’s rebuilding the base underneath it, and that means pulling back siding or interior trim to reach sound framing.
Professional inspection matters most at material transitions: where wood framing meets a concrete stoop, where a threshold spans a sliding patio door track, or where old flashing has failed silently for years — situations that often require specialized new steps and repairs by Heritage Masonry and Brick. A window and door frame rot repair job at that point usually involves replacing damaged framing with pressure-treated lumber or a concrete patch before any new threshold goes in. If the pick test fails, that’s the moment to bring in Star-ws rather than keep pulling boards.
Where Most DIY Threshold Guides Get It Wrong
Most threshold tutorials treat this as a pure carpentry project: measure, cut, screw, done. That framing undersells the one decision that actually determines whether the job succeeds, which is the subsill inspection. Skip the pick test and you can install a beautiful new threshold on top of rotting framing, and it will fail again within a season or two.
The other place conventional advice falls short is the rubber insert recommendation you’ll find in a lot of older guides. Inserts clog, compress, and need replacing constantly. A smooth-top threshold paired with a separate door sweep costs a little more up front but saves you from redoing the seal every year or two.
If there’s one thing worth doing differently than most guides suggest, it’s this: treat the pick test as mandatory, not optional, even when the threshold looks fine on the surface. Rot spreads from the inside out, and by the time it’s visible, you’re usually looking at a repair that’s bigger than a simple swap. Everything else in this process (the template transfer, the three-cut removal, the sealing steps) is straightforward once you know which category of job you’re actually in.
— Artem
Getting a Free Estimate From Star-ws
A professional service gives homeowners a straight answer on threshold and door repairs without the guesswork of diagnosing subsill rot alone. If your pick test came back soft, or you’re staring at a door that won’t seal right no matter how many adjustments you make, a professional estimate settles it fast.

A typical estimate visit covers three things: a hands-on inspection of the subsill and jamb condition, a scope of work that separates a simple threshold swap from a full frame rebuild, and the specific factors driving your price, whether they are material transitions, flashing damage, or matching an older door profile. To speed up your visit, snap a few photos of the threshold and any water staining, jot down your rough measurements, and note when the drafts or leaks started.
If the damage runs deeper than a threshold, professionals also handle the window frame rot repair work that often comes with it. Request a free estimate from a qualified provider today and get a clear answer on what your door actually needs.
Sources
- How to Replace a Door Threshold – This Old House
- Replacing a Door Threshold – Fine Homebuilding
- How To Remove and Replace a Threshold – Home Depot