
Most sagging patio doors often get fixed by replacing the top-hinge screws with longer screws or by adjusting the bottom rollers, and either job usually takes under an hour with basic tools. That won’t help if the frame itself is out of plumb by more than a quarter inch or the foundation has shifted, but that’s the exception, not the rule. Test the hinges or rollers first before assuming you need a carpenter.
TL;DR:
- Most sagging patio doors can be fixed by replacing hinge screws with longer ones or adjusting rollers, usually in under an hour.
- Testing the hinges by lifting the door and marking the latch helps identify whether the problem is loose hinges or misaligned strike plates.
- Fixing hinges involves driving in 3-inch screws into structural framing behind the jamb, especially on the top hinge, which carries most of the weight.
- Adjusting sliding door rollers requires clearing debris and turning small screws in quarter turns to even the gaps and ensure smooth operation.
- Structural issues like foundation shifts or warped frames often cause persistent sagging that cannot be resolved with hardware adjustments alone.
Table of Contents
- Sagging Patio Door Diagnosis: Three Tests That Tell You What’s Wrong
- Fixing a Swinging Patio Door With Loose or Stripped Hinges
- How to Adjust Patio Door Rollers on a Sliding or Gliding Door
- Realigning the Strike Plate After a Hinge or Roller Fix
- What Causes Patio Doors to Sag Beyond Worn Hardware
- Maintenance That Keeps a Patio Door From Sagging Again
- Hinged vs. Sliding Patio Doors: How Sagging Shows Up Differently
- How to Safely Remove a Patio Door Panel for Repair or Replacement
- When a Sagging Door Needs a Professional, Not a Screwdriver
- Getting a Professional Opinion on Your Patio Door
- Sources
- FAQ
Sagging Patio Door Diagnosis: Three Tests That Tell You What’s Wrong
Before touching a screwdriver, figure out what’s actually failing. A sagging patio door usually announces itself in one of four ways, and each points to a different repair.
- Dragging or scraping along the bottom usually means worn or misaligned rollers on a sliding door.
- Binding at the top corner when swinging shut points to a stretched or stripped top hinge.
- A visible diagonal gap between the door and frame, wider at one corner than the other, suggests the whole panel has dropped on its hinge side.
- The latch misses the strike plate or you have to lift the handle to lock it, which often follows hinge or roller sag rather than causing it.
Three quick tests narrow things down further.
The lift-and-drop test. Grab the door handle and lift straight up while watching the gap at the top hinge. If the door rises noticeably and the top corner shifts, the top hinge screws have worked loose in the jamb. This single test catches the majority of hinge-related sag before you remove anything.
The marker test on the latch. Rub a dab of lipstick, chalk, or dry-erase marker on the latch bolt, then close the door gently. The mark it leaves on the strike plate shows you exactly how far off the alignment is and in which direction, which saves you from guessing when you get to the strike plate adjustment later.
The level and reveal check. Hold a level against the door’s vertical edge and against the frame jamb. If the door reads plumb but the frame doesn’t, hardware adjustments alone will only mask the problem temporarily. Also run your eye along the “reveal,” the gap between door and frame, from top to bottom. An even gap means the door is square in its opening; a gap that widens toward the bottom means the panel has dropped.
For sliding and gliding doors, add a visual roller and track check: pull back the weatherstrip near the bottom rail and look for flattened, cracked, or missing roller wheels, plus any debris packed into the track. That single glance tells you whether you’re adjusting existing rollers or replacing them.
Once you know which system is failing, hinge, roller, or strike plate, skip straight to that section below. Trying to fix a strike plate misalignment caused by a sagging hinge just wastes time; fix the root cause first, then check the latch again.
Fixing a Swinging Patio Door With Loose or Stripped Hinges
Hinge screws that only bite into the door jamb, without reaching the framing behind it, are the single most common reason a swinging patio door sags. Standard hinge screws run about three quarters of an inch to one inch long. That’s enough to grip the jamb but not enough to reach the structural stud behind it, so over time the weight of the door works those screws loose.
Tools and materials you’ll need:
- Phillips or flathead screwdriver (or a drill with matching bit)
- 3-inch #9 or #10 coarse-thread wood screws
- Wooden toothpicks or a thin dowel, plus wood glue
- A small chisel
- A metal file
- A level
- Safety glasses
Step-by-step hinge repair
- Confirm hinge play first. With the door closed, wiggle the top hinge leaf gently. Visible movement or gaps around the screw heads confirm the diagnosis.
- Remove one screw at a time, starting with the top hinge. Never pull all the screws from one hinge at once; the door has nothing else holding that side in place.
- Drive in a 3-inch screw in its place, going slowly. Replacing the short factory screws with 3-inch screws that reach the jack or king stud behind the jamb gives the hinge dramatically more holding power than screws anchored only in jamb wood, and this single fix resolves roughly 90 percent of sagging-door cases.
- Check fit before moving to the next screw. Open and close the door once the first long screw is seated. If it swings freely and the gap at the top has closed, repeat with the remaining hinge screws.
- Move to the middle and bottom hinges only if play persists after the top hinge is done. The top hinge carries most of the door’s vertical load, so it’s worth doing first and checking results before assuming you need to redo the whole door.
If a screw hole is stripped and won’t hold a new screw at all, pack it with wood-glue-coated toothpicks or a short dowel piece, let the glue cure for a couple of hours, then re-drive the screw into the repaired hole. This toothpick-and-glue method works well for shallow stripping, though a long screw into fresh framing is still the more permanent fix wherever you can reach it.
Sometimes the hinge leaf itself sits proud of the mortise, or the mortise was cut too deep, leaving a visible gap behind the hinge plate. A thin cardboard shim behind the leaf closes that gap and stops future loosening. Planing the door edge to compensate for sag is a workaround, not a repair. It can buy you time, but it doesn’t address the actual hinge failure and makes the door harder to weatherstrip properly later.
Once the hinges are tight, mark the latch contact point again and run the door through a few open-close cycles. If it swings smoothly but the latch now misses the strike plate, that’s expected. The hinge repair shifted the door slightly, and the strike plate section below walks through the fix.
Pro Tip: Do the top hinge first and test before touching the others. Since the top hinge bears most of the door’s weight, fixing it alone often solves the sag completely, and you avoid unnecessary work on hinges that were never the problem.
How to Adjust Patio Door Rollers on a Sliding or Gliding Door
Sliding patio doors don’t sag from hinge failure; they sag because the rollers underneath the panel wear down, go out of adjustment, or get clogged with debris in the track. The fix lives in a small adjustment screw near the bottom corner of the panel, not in the hardware you can see from the room.
Tools and safety gear:
- Small Phillips or flathead screwdriver
- Silicone spray lubricant (not oil-based; it grabs dust and grit)
- A vacuum with a narrow attachment
- A soft blanket or moving pad to rest the panel on if you remove it
- A replacement roller kit, if the existing rollers are damaged
Step-by-step roller adjustment
- Clear the track first. Vacuum out dirt, leaves, and pet hair before doing anything else. A packed track can mimic the symptoms of roller sag, so ruling this out saves you an unnecessary adjustment.
- Locate the adjustment holes or caps, usually near the bottom corners of the sliding panel, sometimes hidden behind a small plastic cover.
- Turn the adjustment screw in quarter turns. Bottom rollers on wood and vinyl patio doors adjust through these access points, and manufacturer guidance recommends small increments with a test after each one rather than cranking the screw all at once.
- Check the reveal after each adjustment. Slide the door and look for an even gap along the top and sides. Uneven gaps mean one roller needs more adjustment than the other.
- Test the lock. Once the panel glides smoothly, engage the latch and confirm it seats fully without you needing to lift or shove the panel into place.
If a roller is cracked, flattened, or missing wheels entirely, adjustment won’t help; it needs replacing. Lay the panel flat on a padded surface, remove the retaining screws at the bottom rail, slide out the old roller assembly, and install the replacement kit matched to your door’s brand and track width. Two people make this easier since patio door panels are heavier and more awkward than they look.
Resist the urge to crank the rollers as high as they’ll go. Raising a sliding panel too far can break the seal between the door and the weatherstrip, letting in water and air, which trades a sagging-door problem for a drafty, leaky one. Adjust just enough to clear the track and stop the drag.
Bent tracks, a sill that’s no longer level, or a multi-panel door where one panel is misaligned relative to the others usually sit past the point where roller adjustment alone will fix things. If you’ve cleaned the track, adjusted both rollers evenly, and the door still binds or won’t seat, that’s a sign of a bigger structural issue rather than a hardware one. Our guide to sticking sliding doors covers a few more track-cleaning checks worth running before you call in help.
Pro Tip: Test the door’s operation at three points, not one: fully open, fully closed, and midway across the track. A door that glides fine in the middle but binds near the frame usually has a track issue, not a roller issue.
Realigning the Strike Plate After a Hinge or Roller Fix
Once the door hangs correctly again, the latch sometimes still misses the strike plate by a fraction of an inch. That’s a five-minute fix, not a sign you did the hinge or roller repair wrong.
Start by marking the latch bolt with a dab of lipstick, chalk, or a dry-erase marker, then close the door without engaging the lock. The mark left on the strike plate shows exactly where the latch is actually hitting versus where the opening sits, which tells you which direction to move the plate.
From there, a few options, roughly in order of how much work they involve:
- Loosen the strike plate screws and shift the plate slightly up, down, or sideways to match the mark, then retighten.
- File the strike opening gradually with a metal file if the latch is only missing by a sliver. Remove a little material, test, remove a little more; don’t try to open it up in one pass.
- Swap in an adjustable strike plate, which has a slotted design built for exactly this kind of fine-tuning and saves you from repeated filing if the door shifts again seasonally.
- Chisel a deeper or repositioned mortise if the plate needs to move more than the screw holes allow, then patch and redrill.
If the latch won’t catch at all and you need the door secure in the meantime, a temporary security bar or a slide bolt above the main lock keeps things safe while you finish the adjustment. Our quick fixes for a door that won’t latch page has a few more troubleshooting angles if the strike plate isn’t the whole story.
What Causes Patio Doors to Sag Beyond Worn Hardware
Hinges and rollers take the blame most often, but they’re sometimes just the symptom of something happening in the structure around the door. A house settles over years, and even a small shift in the foundation, an eighth of an inch here, a quarter inch there, can twist a door frame just enough that the door no longer hangs square. You’ll usually see this as a gap that’s wider at the top than at the bottom, or vice versa, rather than a uniform drag across the whole panel.
Wood-framed patio doors can also warp from moisture. A jamb that’s absorbed water from a leaky sill or poor flashing swells, twists slightly, and throws the hinge or latch alignment off even when the hardware itself is fine. Weather plays a role too: door frames exposed to direct sun on one side and shade on the other expand and contract unevenly across seasons, which is why some doors seem to sag worse in summer or after a cold snap.
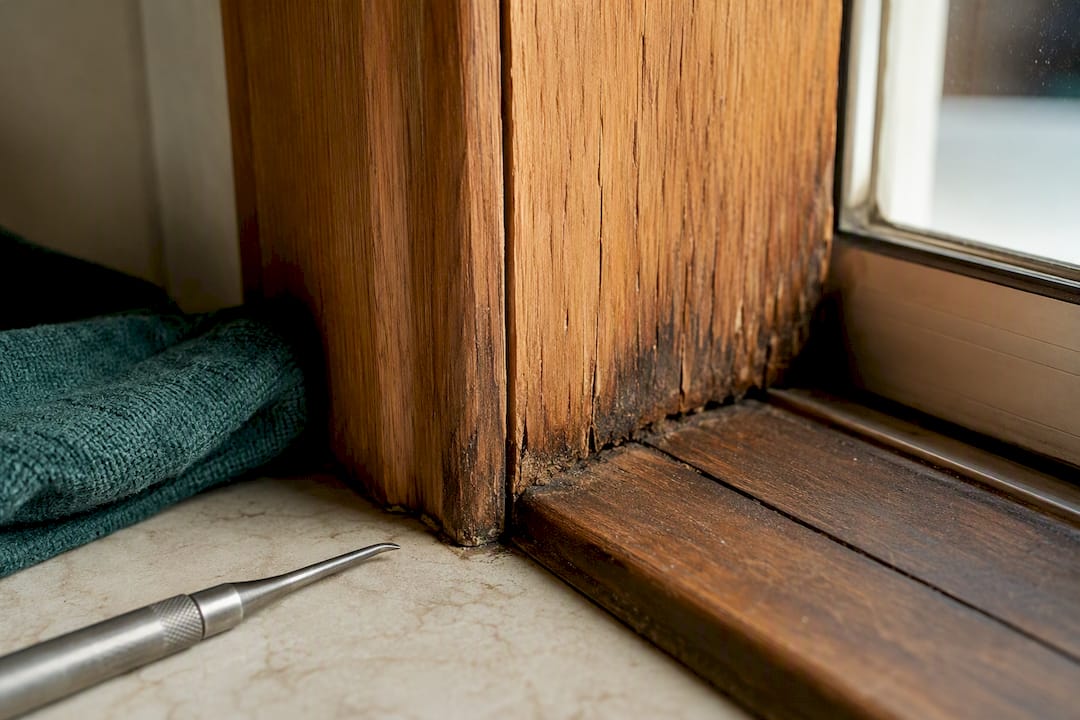
None of these causes respond to a hinge-screw swap or a roller adjustment, because the hardware isn’t actually broken; it’s fighting a frame that’s no longer the shape it was built to fit. If you’ve done the diagnostic tests above and the door still won’t hang right, or if the sag reappears within weeks of a repair, a structural cause is worth suspecting before you keep re-adjusting hardware that’s fine.
Maintenance That Keeps a Patio Door From Sagging Again
A patio door that’s been properly repaired can still drift out of alignment if nobody checks it again for a few years. Prevention here is genuinely simple, and it’s mostly a matter of doing small checks before they become big ones.
Twice-yearly hardware checks, once as the weather turns cold and once as it warms up, catch loose screws and worn rollers early, before they’ve stretched the mortise or scored the track. Wiggle the top hinge, check the reveal along the door’s edge, and slide the panel through its full range if it’s a gliding door.
Keep the track clean. Dirt, sand, and pet hair packed into a sliding door’s track accelerate roller wear and can make a fine door feel like it’s sagging when it’s actually just dragging on debris. A vacuum pass every few months handles most of it.
Use the right lubricant. Silicone-based spray lubricant is the better choice for rollers and tracks because it doesn’t attract grit the way oil-based products do; oil turns into a paste of dust and grease that actually makes rollers stick worse over time.
Finally, don’t ignore small binding the first time you notice it. A door that catches slightly for a week rarely fixes itself, and the load of forcing it shut repeatedly is what turns a minor adjustment into stripped screw holes or a cracked roller.
Hinged vs. Sliding Patio Doors: How Sagging Shows Up Differently
The repair playbook depends heavily on which type of patio door you’re dealing with, because hinged and sliding doors fail in almost opposite ways.
Hinged patio doors (French doors and single-swing patio doors) sag at the hinge side. The weight of the panel pulls down on the top hinge screws over years, and because there’s no roller system to compensate, the entire door drops slightly on that side. This shows up as binding at the top corner opposite the hinges and a widening gap along the bottom. The fix is almost always mechanical: tighten or replace hinge screws, shim the hinge leaf, or address a stripped mortise.
Sliding and gliding patio doors carry their weight on wheeled rollers riding in a track rather than on hinges, so “sagging” usually means the rollers have worn flat, gone out of adjustment, or the track has accumulated debris that changes how the panel sits. The visible symptom is dragging along the bottom rail rather than a gap at a hinge corner.
Bifold and multi-panel sliding doors add a layer of complexity because several panels have to stay aligned with each other, not just with the frame. One worn roller on a single panel can throw off the reveal across the entire assembly, which is why multi-panel doors sometimes need a professional’s eye even when the individual repair steps are the same.
Knowing which category your door falls into before you start prevents wasted effort. Nobody should be hunting for hinge screws on a sliding door, and adjusting nonexistent rollers on a French door won’t do anything.
How to Safely Remove a Patio Door Panel for Repair or Replacement
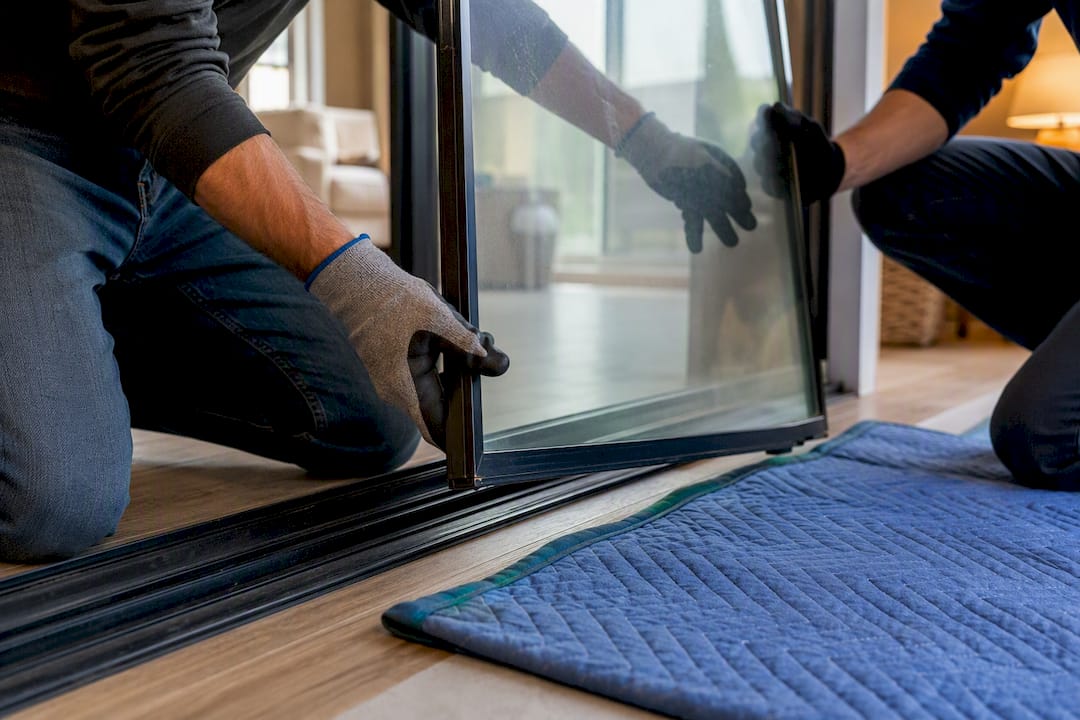
Some repairs, like swapping a damaged roller assembly or fixing a warped bottom rail, require getting the panel out of its frame entirely. Sliding patio door panels are heavier than they look, often 100 pounds or more for a full-size glass panel, so this is a two-person job.
Start by removing any screens and clearing the track of obstructions. On most sliding doors, you’ll find a stop or screw at the top of the frame that keeps the panel from being lifted out during normal use. Removing that stop, or in some designs loosening a top adjustment screw, gives the panel enough vertical clearance to lift clear of the bottom track.
With one person on each side of the panel, lift it up until the bottom rollers clear the track, then angle the bottom out and away from the frame while keeping the top edge tucked under the head jamb. Set it down immediately on a padded surface, blankets or a moving pad work fine, glass side supported evenly so no single point bears the weight.
For hinged doors, the process is different: support the panel’s weight with a pry bar or a second person while removing the hinge pins or unscrewing the hinge leaves from the jamb, working from the bottom hinge upward so the door doesn’t twist as the last hinge comes free.
Whichever door type you’re working with, never leave a removed panel leaning unsupported, and never attempt this solo with a full-glass panel. If the removal reveals rot in the sill or jamb, that’s usually the point to stop the DIY project and get a professional assessment before reinstalling anything.
When a Sagging Door Needs a Professional, Not a Screwdriver
DIY fixes solve most sagging patio doors, but a few warning signs mean you’re past the point where hardware adjustments will hold. If the frame is out of plumb by more than about a quarter inch, the frame itself needs correction, not just the door hardware, and planing the door edge to compensate is only a stopgap. Add split jambs, metal-framed doors where a 3-inch screw simply can’t reach usable framing, visibly bent tracks, or a multi-point lock mechanism that won’t engage no matter how the hardware is adjusted, and you’re looking at a repair that goes beyond screws and rollers.
A professional’s process usually starts where yours left off: checking plumb and square, then deciding whether the fix is re-squaring the existing frame, replacing a rotted or warped jamb, or rebuilding the track system on a sliding door. Glass panels also need careful handling; reglazing or replacing a cracked or fogged insulated unit requires tools and safety practices most homeowners don’t keep around for a once-a-decade job. Star-ws has handled cases like a shattered glass panel on a sliding patio door where the glass damage and the frame misalignment needed to be solved together rather than as two separate problems, and similar situations come up with hardware replacement on rotted casement frames where the fastener problem was really a wood-rot problem underneath.
If you’re at this stage, a few photos speed things up enormously: a wide shot of the whole door from outside, a close-up of the gap or binding point, and a shot of the hinge or roller hardware if you can get to it. Notes on when the sag started and whether it’s gotten worse recently help a technician narrow down causes before they even arrive, which usually means a faster, more accurate quote.
— Artem
Getting a Professional Opinion on Your Patio Door
If you’ve worked through the hinge or roller fixes above and the door still won’t sit right, or you’ve spotted a frame issue that’s past a homeworker’s toolkit, Star-ws handles exactly this kind of job across the Kansas City area, from hardware repair to full door replacement.

A service visit usually starts with a straightforward inspection: checking plumb, testing hinges and rollers, and looking at whether the frame or jambs have taken on rot or moisture damage. From there, you get a clear read on whether the fix is a hardware swap, a hardware replacement job, a jamb repair, or a full door replacement, along with a free estimate before any work starts. Financing options are available for larger jobs, which matters if a frame issue turns into more than a weekend project. If your patio door’s glass took damage along with the hardware, the same visit can cover glass replacement at the same time, so you’re not scheduling two separate appointments for one door.
If your door is still sagging after trying the steps above, or you’d rather skip straight to a professional fix, request a free estimate through Star-ws and get a technician’s read on what your door actually needs.
Sources
- How to Fix a Sagging Door: Hinge Screws, Shims, and Strike Plate Adjustment (2026)
- Wood Patio Doors (JPG012) – roller and hinge adjustment guidance (Lowe’s product doc)
- How To Adjust A Patio Door – Euroseal Windows & Doors
FAQ
How Can I Fix a Sagging Patio Door?
For a hinged door, replace the top-hinge screws with 3-inch screws that reach the framing behind the jamb; for a sliding door, adjust the bottom rollers through their access holes in small increments until the panel glides evenly.
My Sliding Door Is Sagging. How Can I Fix It?
Clean the track first, then locate the roller adjustment screws near the bottom corners of the panel and turn them in quarter-turn increments, testing the gap after each adjustment until the door glides without dragging.
How Do I Fix a Door That Jiggles When Closed?
A door that jiggles or rattles when closed usually has a loose strike plate or worn hinge screws; mark the latch contact point with a marker, then tighten or reposition the strike plate, and check hinge screws for play at the same time.
What’s the Easiest Way to Fix a Sagging Door?
Swapping the top-hinge screws for 3-inch wood screws is the fastest fix for most swinging patio doors, since the top hinge carries most of the door’s weight and this single change resolves roughly 90 percent of sagging cases.
When Should I Call a Professional Instead of Fixing It Myself?
Call a professional if the frame is out of plumb by more than a quarter inch, the jamb is split, the tracks are visibly bent, or you’re dealing with a metal frame where standard long screws can’t reach solid framing.