
Siding and window interaction is defined as the coordinated integration of siding materials and window assemblies that form a continuous, weather-tight exterior building envelope. When these two systems work together correctly, they block moisture, reduce air leaks, and maintain thermal performance across the entire wall. When they don’t, the consequences show up fast: rotted framing, spiking energy bills, and water stains that spread deeper than they look. Understanding this relationship is the first step toward making smarter decisions about your home’s exterior, whether you’re planning a full renovation or replacing a single window.
What is siding and window interaction, and why does it matter?
Siding and window interaction describes the physical and functional connection between your window assemblies and the surrounding wall cladding. The industry term for this zone is the “building envelope interface,” and it covers every point where the window frame meets the siding, trim, flashing, and weather-resistive barrier (WRB) behind it.
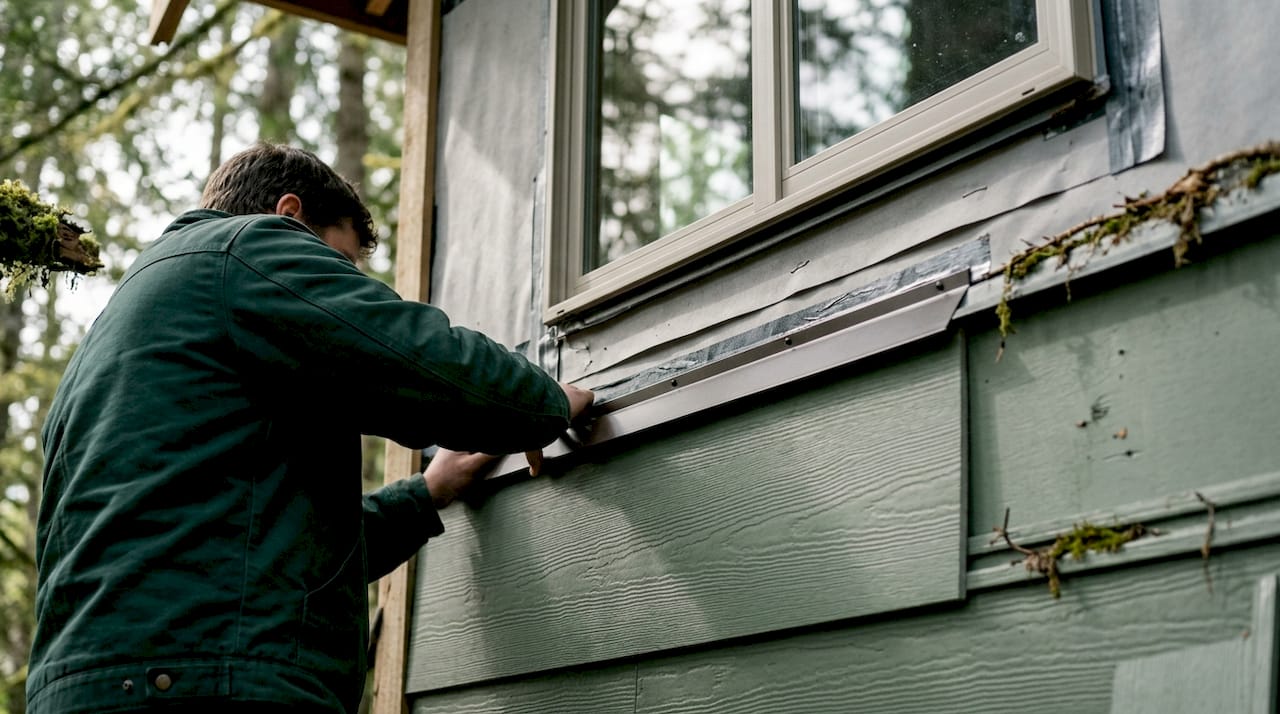
This interface is the top cause of moisture infiltration in residential buildings. A 3-sided drainage envelope is required at every window opening to direct water away from framing and insulation. Without it, water finds the path of least resistance directly into your wall cavity.
The stakes go beyond leaks. Bundled projects that treat siding and windows as one system deliver better energy efficiency through continuous thermal bridging control and integrated flashing. Piecemeal upgrades leave gaps that no amount of caulk can fully fix.
What are the key components at the siding-window interface?
The siding-window junction relies on several physical components working in a specific sequence. Each one has a defined job, and skipping any one of them creates a weak point.
- Sill pan flashing: A sloped tray installed at the bottom of the rough opening. It catches any water that gets past the window and directs it outward, away from the framing.
- Jamb flashing: Membrane or metal strips applied to the sides of the rough opening. They seal the gap between the window frame and the framing lumber.
- Head drip cap: A metal or PVC cap installed above the window. It sheds water over the top of the window frame and onto the siding below.
- House wrap or WRB: The continuous membrane behind the siding. Flashing must lap over and under the WRB in the correct sequence to maintain a drainage plane.
- Trim: Window trim is not decorative. Trim bridges siding and window materials while maintaining a continuous drainage plane. Contractors frequently undervalue it, treating it as a finish detail rather than a waterproofing component.
Caulking plays a supporting role, not a primary one. Caulk is secondary waterproofing. Primary protection comes from shingle-lapping flashing under the WRB layers and placing head drip caps correctly so water sheds away rather than pooling at the frame.
Pro Tip: When inspecting an existing window installation, check whether the head drip cap sits on top of the WRB or under it. If it’s under the WRB, water can track behind the cap and into the wall. That single detail causes more rot than almost any other flashing error.
How do siding and windows work together for energy efficiency?
The building envelope functions as a continuous thermal and air barrier. When siding and windows are installed as a unified system, that barrier stays intact. When they’re installed separately, at different times or by different crews, gaps appear at every junction.
“Replacing windows and siding at the same time allows for the application of continuous insulation and seamless air sealing that is simply impossible to achieve with piecemeal upgrades. This ‘one-and-done’ philosophy improves both energy efficiency and exterior durability in ways that sequential projects cannot replicate.”
— Why You Should Replace Siding and Windows at the Same Time
Here is how a coordinated installation improves performance step by step:
- Continuous insulation layer: When siding comes off, installers can add rigid foam insulation across the entire wall before re-cladding. This eliminates thermal bridging at studs, which accounts for a significant share of heat loss in wood-framed walls.
- Integrated air sealing: With the rough openings exposed, crews can seal every penetration before the WRB goes on. Air sealing at this stage is far more effective than spray foam applied after the fact.
- Reduced HVAC load: A tighter envelope means your heating and cooling system works less to maintain indoor temperature. The comfort improvement is noticeable within the first heating season.
- Moisture control: Continuous WRB installation, lapped correctly at every window opening, prevents the interstitial condensation that degrades insulation and framing over years.
Replacing windows alone, without addressing the surrounding siding and WRB, often leaves the thermal envelope broken at every window perimeter. You get a new window inside an old, leaky wall.
What installation sequencing produces the best results?
Sequencing is where most renovation projects go wrong. The correct order is windows first, then siding. This sequence protects the cladding, reduces labor costs, and allows proper flashing integration.
| Sequence | Cost impact | Flashing quality | Cladding damage |
|---|---|---|---|
| Windows first, then siding | Lowest total cost | Full integration possible | None |
| Siding first, then windows | Added $1,500–$3,500 per window | Retrofit flashing only | Partial removal required |
| Windows and siding together | Best overall value | Full integration possible | None |
Replacing windows separately from existing siding typically adds $1,500–$3,500 per window in labor and material costs. That premium pays for removing partial cladding, integrating new flashing with old siding, and patching the disturbed area. It is avoidable cost.
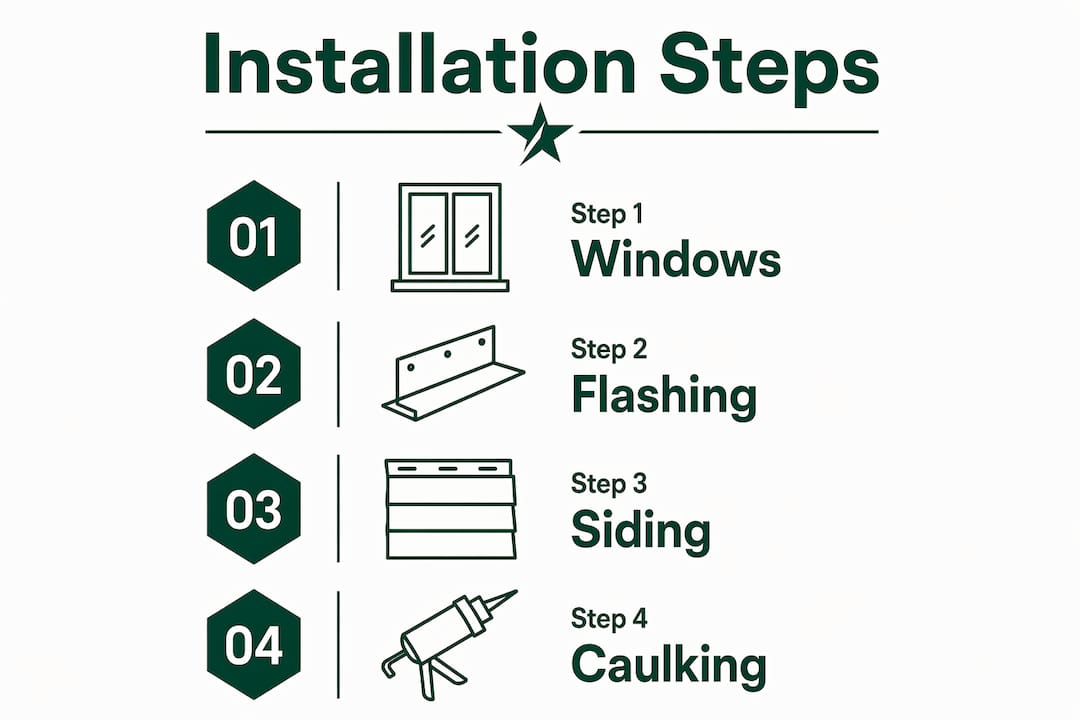
The correct installation sequence follows this logic:
- Rough opening preparation: The opening must be square, plumb, and free of rot before any flashing goes in. Sill pan flashing and sealing all through-wall penetrations before WRB application is the single most important step for long-term durability.
- Flashing integration: Sill pan first, then jamb membranes, then the window unit, then the head drip cap. The WRB laps over the head drip cap and under the sill pan. This shingle-lap sequence sheds water at every layer.
- Siding installation: Siding installs last, lapping over the flashing system. Trim goes on after siding, sealing the perimeter without relying on caulk as the primary defense.
Pro Tip: If you’re replacing windows in a home with existing siding you plan to keep, ask your contractor to document the flashing details before closing the wall. Photos of the sill pan and WRB laps give you proof of quality and a reference point for any future moisture issues.
How do siding materials affect window performance?
Different siding materials create different challenges at the window junction. The choice of cladding directly affects flashing methods, trim requirements, and long-term moisture management.
- Vinyl siding: Installs quickly and costs less upfront, but it requires specific J-channel trim at window perimeters. Vinyl also carries a risk that most homeowners don’t expect: sunlight reflected from low-E double-paned windows can generate enough heat to warp or melt vinyl siding installed too close to the glass. Minimum distance guidelines and shielding details matter here.
- Fiber cement: Heavier and more dimensionally stable than vinyl. It accepts paint, holds up well against moisture, and works with standard metal flashing. Fiber cement requires back-priming cut edges to prevent moisture absorption at trim joints.
- Wood and engineered wood: These materials demand the most careful flashing and sealing. Any gap in the drainage plane accelerates rot. Engineered wood products like LP SmartSide perform better than solid wood in wet climates, but they still require proper integration with the WRB and window trim.
- Brick and stone veneer: These materials require a dedicated drainage cavity behind the cladding. Window flashing must integrate with weep screed systems at the base of each opening. Skipping this step traps water inside the veneer and against the framing.
The window-area siding application around each opening deserves as much attention as the window itself. Trim profiles, back-caulking details, and material transitions at corners all affect how long the system performs without maintenance.
What common problems occur at the siding-window junction?
The siding-window junction fails in predictable ways. Knowing the failure modes helps you catch problems early, before they reach the framing.
- Improper flashing sequence: The most common error is installing the head drip cap under the WRB instead of over it. Water tracks behind the cap and saturates the rough opening. Moisture damage at window frames follows within a few years.
- Missing sill pan: Without a sill pan, any water that gets past the window sits directly on the rough sill framing. Wood rot at the sill is the result. This is the failure mode behind most window sill rot repairs.
- Over-reliance on caulk: Caulk shrinks, cracks, and fails within 5–10 years. A wall system that depends on caulk as its primary water barrier will leak. The ASTM E2112 standard for window and door installation specifies a continuous exterior drainage plane, not a caulk-dependent seal.
- Vinyl siding heat damage: Low-E glass reflects concentrated sunlight onto adjacent siding. Vinyl within the reflected beam zone can warp or buckle. The fix is either a window screen, an awning, or a minimum setback between the glass and the siding surface.
- Piecemeal upgrades: Replacing one component without addressing the other leaves the interface compromised. A new window in old siding, or new siding around an old window, almost always creates a flashing mismatch that lets water in.
Regular inspection of the perimeter caulk, trim paint, and siding condition within 12 inches of every window catches most of these problems before they become structural repairs.
Key Takeaways
Siding and windows form a single building envelope system, and every installation or repair decision at their junction affects energy efficiency, moisture control, and long-term structural integrity.
| Point | Details |
|---|---|
| Treat them as one system | Siding and windows share a building envelope; failures at their junction cause moisture damage and energy loss. |
| Sequence windows before siding | Installing windows first avoids $1,500–$3,500 per window in added labor and cladding repair costs. |
| Flashing is the primary defense | Sill pans, jamb membranes, and head drip caps shed water; caulk is only a secondary backup. |
| Material choice affects risk | Vinyl siding near low-E glass can warp from reflected heat; fiber cement and engineered wood carry fewer risks. |
| Inspect the junction regularly | Check trim, caulk, and siding within 12 inches of every window at least once a year to catch failures early. |
What I’ve learned from watching these systems fail
Most homeowners treat windows and siding as two separate budget line items. They replace the windows one year and the siding the next, thinking they’re being financially responsible. In practice, that decision costs more than doing both at once, and it almost always leaves the flashing compromised at every opening.
The contractors I’ve seen do this work correctly share one habit: they think about water first. Before they touch a window or a piece of siding, they ask where water will go if it gets past the first layer. That question drives every flashing detail, every WRB lap, and every trim decision. Homeowners who ask that same question when interviewing contractors get dramatically better results.
The other thing I’ve noticed is that trim gets no respect. Homeowners pick trim profiles based on looks. Contractors sometimes install it as an afterthought. But trim is a mechanical component. It bridges two different materials, each with different expansion rates and moisture responses, and it has to do that job for 20 years without failing. Choosing the right trim profile and back-caulking it correctly before installation is the detail that separates a 5-year repair cycle from a 20-year maintenance-free exterior.
If you’re planning any exterior work, get the flashing sequence in writing before the job starts. Ask your contractor to show you the sill pan before the window goes in. That one conversation will tell you everything you need to know about whether they understand the building envelope or just the surface.
— Artem
Star-ws brings precision to every window and siding project
Star-ws specializes in window and siding integration for residential and commercial properties across the Kansas City area. Every project starts with a thorough assessment of the existing building envelope, including flashing condition, WRB integrity, and trim details, before any new material goes in.

Whether you need a single window frame rot repair or a full exterior replacement that coordinates new windows with new cladding, Star-ws delivers the flashing details and installation sequencing that protect your home for decades. The team offers free estimates and financing options, so you can plan the right scope without compromising on quality. Contact Star-ws to schedule your consultation and get a clear picture of what your building envelope actually needs.
FAQ
What is siding and window interaction in simple terms?
Siding and window interaction is the physical and functional connection between your window assemblies and the surrounding wall cladding. When properly coordinated, these two systems form a continuous, weather-tight building envelope that blocks moisture and air infiltration.
Should windows or siding be replaced first?
Windows should be replaced before siding. Installing windows first allows proper flashing integration and avoids the $1,500–$3,500 per window added cost of removing and repairing cladding after the fact.
Why is flashing more important than caulk at window openings?
Flashing creates a physical drainage plane that sheds water away from framing. Caulk is a secondary seal that shrinks and cracks over time. The ASTM E2112 standard requires a continuous drainage plane, not a caulk-dependent system.
Can low-E windows damage vinyl siding?
Yes. Sunlight reflected from low-E double-paned windows can generate enough concentrated heat to warp or melt vinyl siding installed too close to the glass. Minimum setback distances and shielding details reduce this risk.
What happens if siding and windows are not treated as one system?
Piecemeal upgrades leave flashing mismatches at every window opening. These gaps allow moisture intrusion that leads to wood rot, insulation degradation, and higher energy costs, often within a few years of installation.