
Window hardware replacement types are the essential mechanical components — from crank operators to sash balances — that control how your windows open, close, lock, and seal. Choosing the wrong part causes binding, air leaks, and security failures. With over 80,000 unique hardware variations on the market, getting the right fit requires knowing your window style, measuring accurately, and selecting materials built for your environment. This guide covers every major hardware category, how to identify compatible parts, and what to look for before you buy.
1. What are the different window hardware replacement types by window style?
Window hardware is not universal. Each window style uses a specific set of operating parts, and swapping in the wrong type causes mechanical failure fast.
Casement windows
Casement windows crank outward on a side hinge. They use three core hardware types:
- Crank operators: The gear-driven handle that opens and closes the sash. Operators vary by arm length, gear ratio, and mounting hole spacing. Brands like Truth Hardware and Roto Frank produce style-specific operators that are not interchangeable.
- Friction hinges: These hold the sash at any open angle. They wear out from repeated use and need replacement when the sash drops or swings freely.
- Multi-point locks: A single handle engages multiple lock points along the frame. Replacing one lock point without matching the others breaks the seal and compromises security.
Double-hung windows
Double-hung windows slide vertically and rely on a balance system to hold each sash in place.
- Sash balances: These counterbalance the sash weight. They come in spiral, block-and-tackle, and constant-force types. Matching the stamped weight code on the balance is critical. An incorrect weight code means the sash will not stay open and can drop unexpectedly.
- Sash locks: The cam-style lock that draws both sashes together at the meeting rail. Worn locks leave gaps that reduce energy efficiency.
- Tilt latches: These release the sash for cleaning. Broken tilt latches prevent the sash from tilting inward, making cleaning impossible and sometimes trapping the sash.
Sliding windows
Sliding windows move horizontally along a track. Their hardware wears faster than most styles because every operation drags parts across a surface.
- Rollers: Plastic or metal wheels mounted in the sash bottom. Flat or cracked rollers cause the window to drag and jump the track.
- Sliding locks: A simple latch that engages a strike on the frame. These corrode quickly in humid climates.
- Weatherstripping: Not a mechanical part, but a hardware replacement component. Worn pile or foam weatherstripping on sliding windows accounts for a large share of drafts and energy loss.
Tilt-and-turn windows
Tilt-and-turn windows offer two opening modes: a top tilt for ventilation and a full side swing for access. Their hardware is the most complex of any residential window style.
- Dual-function handles: A single handle rotates to select tilt or turn mode. These handles connect to an internal gearbox and are brand-specific.
- Espagnolette locks: A multi-point locking bar runs around the sash perimeter. Replacing one section without matching the full system leaves gaps in the lock sequence.
- Safety restrictors: Building codes in many jurisdictions require restrictors on upper-floor windows to limit opening width. These are hardware replacement parts, not optional accessories.
2. How to identify and measure window hardware replacement parts for compatibility
Accurate identification is the single most important step in any window hardware installation project. 1 in 5 DIY replacements fail due to incorrect parts, even when the new part looks identical to the old one.
Follow these steps to get the right match:
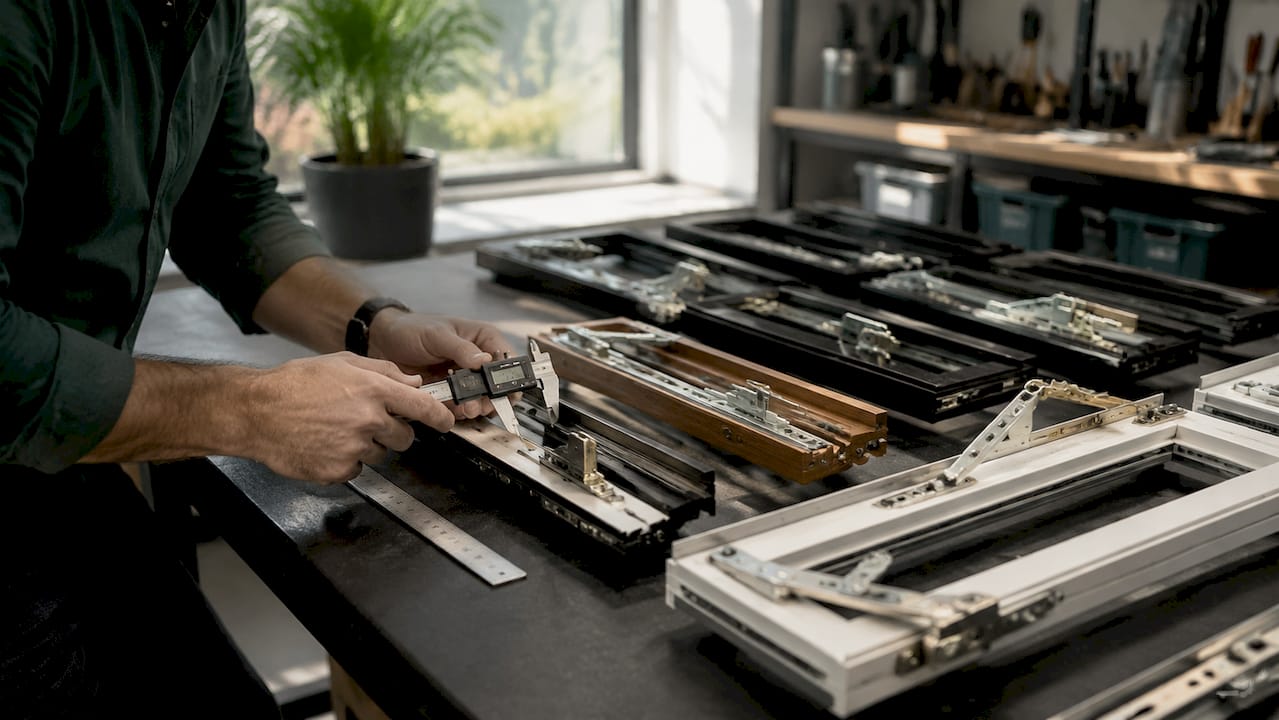
- Remove the existing hardware first. Do not order from a photo alone. Take the part off the window so you can measure it directly.
- Measure arm length and hole spacing. For crank operators, measure the arm from pivot to tip. For sash balances, measure channel length. Measurements to within 1/16 inch are required for proper fit. A difference of 2mm in hole spacing means the part will not mount flush.
- Locate manufacturer stamps and part numbers. Most hardware carries a brand stamp, part number, or alphanumeric code on the back or side. For sash balances, the stamped code encodes the weight range. For operators, the stamp identifies the gear ratio and arm style.
- Photograph everything before disassembly. Take photos of the hardware in place, the stamp or part number, and the mounting holes. This record prevents ordering errors and speeds up returns if needed.
- Cross-reference with brand catalogs. Window Hardware Direct, Jaspector, and TruthParts all maintain searchable part databases. Use the part number or measurements to confirm compatibility before purchasing.
Pro Tip: If the manufacturer stamp is worn or missing, bring the physical part to a window hardware specialist. A visual match is not enough. Gear ratios and mounting patterns differ between production years even within the same brand.
Avoid universal or “fits most” replacement parts for any load-bearing or locking component. Universal fits often cause mechanical issues including binding, stripped gears, and failed seals. They may work for a season, but they rarely last.
3. Comparison of window hardware materials and their durability
Material choice determines how long your replacement hardware lasts. The wrong material in the wrong environment fails within a few years.
| Material | Best Use | Corrosion Resistance | Typical Lifespan |
|---|---|---|---|
| Stainless steel | Coastal, humid, high-use | Excellent | 15+ years |
| Brass | Interior decorative hardware | Good | 10–15 years |
| Aluminum | Standard residential | Moderate | 8–12 years |
| Zinc alloy | Budget residential | Low | 5–8 years |
| Reinforced plastic | Low-load components | Varies | 5–10 years |
Selecting hardware based on appearance rather than performance ratings results in failures within 2–3 years. This is the most common mistake homeowners make when sourcing replacement parts online. A chrome-plated zinc operator looks identical to a stainless steel one in a product photo. The difference shows up after two winters.
Stainless steel and heavy-duty aluminum are the right choices for exterior-facing hardware, high-traffic commercial windows, and any installation within a few miles of the ocean. Brass works well for interior locks and handles where corrosion exposure is low. Reinforced plastic rollers are acceptable for sliding windows in dry climates but degrade quickly with UV exposure.
Pro Tip: Ask your supplier for the base material, not just the finish. “Brushed nickel” is a finish, not a material. The base metal underneath determines durability.
4. Signs that it’s time to replace your window hardware
Hardware failure rarely happens all at once. It builds gradually, and catching it early prevents bigger repairs.
Watch for these warning signs:
- Stiff or grinding operation: A crank that requires extra force signals gear wear or a stripped worm drive. Continuing to force it damages the sash frame.
- Rust or visible corrosion: Surface rust on locks or hinges spreads to the frame. Corroded sash balances lose tension and drop the sash.
- Locking failure: A lock that does not engage fully leaves the window unsecured. This is both a security and an energy efficiency problem.
- Sash misalignment: A sash that sits crooked in the frame points to failed balances or worn hinges. Misalignment breaks the weatherstrip seal and allows air infiltration.
- Drafts near the frame: Drafts that appear after years of no issues often trace back to worn weatherstripping or a lock that no longer pulls the sash tight.
Early hardware replacement prevents structural damage and improves window function. Waiting until a component fully fails often means the frame absorbs the stress, turning a $40 part replacement into a $400 frame repair.
Proactive replacement extends window lifespan and keeps energy costs stable. A window with failed balances or a broken lock works against your HVAC system every hour it stays in service. The cost of window repair versus full replacement is dramatically lower when hardware issues are caught before frame damage sets in.
5. How window hardware functions as an integrated system
Replacing one hardware component without evaluating the rest of the window is a common mistake. Window hardware functions as an interconnected system. Changing one part affects the load on hinges, the alignment of lock points, and the compression of weatherseals.
A new high-tension crank operator installed in a rotted or warped frame generates excessive torque on the gear housing. Misaligned or rotted frames combined with new hardware cause premature failure, often within one season. The hardware is not defective. The system is out of balance.
Before replacing any operating hardware, inspect the frame for rot, the weatherstripping for compression loss, and the sash corners for separation. A window frame rot repair done at the same time as hardware replacement produces results that last. Doing them separately means the second repair undoes the first.
This system-level thinking also applies to multi-point locks on casement and tilt-and-turn windows. Replacing one lock point without checking the others leaves the sash pulling unevenly against the frame. The result is a window that looks locked but leaks air at every unchecked point.
Key takeaways
Selecting the right window hardware replacement types requires matching parts to your specific window style, measuring to within 1/16 inch, and choosing materials rated for your environment and use level.
| Point | Details |
|---|---|
| Match hardware to window style | Casement, double-hung, sliding, and tilt-and-turn windows each require specific, non-interchangeable parts. |
| Measure before ordering | Arm length, hole spacing, and weight codes must match exactly. Visual similarity is not enough. |
| Choose material by environment | Stainless steel outperforms zinc alloy in humid or coastal conditions by a wide margin. |
| Replace hardware as a system | Inspect the frame and weatherstripping whenever you replace operating hardware to avoid premature failure. |
| Act on early warning signs | Stiff operation, rust, and locking failure signal hardware wear before structural damage occurs. |
What I’ve learned about window hardware after years in the field
The biggest mistake I see on residential and commercial projects is treating hardware replacement as a parts swap. Someone orders a crank operator because it looks like the old one, installs it in 20 minutes, and calls it done. Six months later, the gear strips out. The problem was never the part. It was the frame condition, the gear ratio mismatch, or a sash balance that was already failing and putting extra load on the operator.
I’ve worked on projects where the window manufacturer had changed the gear ratio on the same model number between production runs. The part number matched. The mounting holes lined up. But the gear ratio was different, and the new operator fought the sash instead of working with it. That kind of detail does not show up in a product photo or a basic spec sheet.
My advice: treat every hardware replacement as a diagnostic opportunity. Pull the part, measure it, check the frame, check the weatherstripping, and look at every component the new hardware will interact with. The integrated system approach takes 20 extra minutes and saves hours of callbacks.
For code-driven projects, especially commercial work or upper-floor residential windows, always verify local requirements before ordering. Safety restrictors, trickle vents, and egress-rated hardware are not optional. Getting that wrong means pulling the hardware out and starting over.
— Artem
Window hardware replacement services from Star-ws
Star-ws handles window hardware replacement for residential and commercial properties across the Kansas City area, from single crank operators to full multi-point lock systems.
The Star-ws team identifies compatible parts by window style and manufacturer, sources hardware rated for your specific use and environment, and installs everything as part of a full system check. That means frame condition, weatherstripping, and sash alignment are all evaluated before new hardware goes in. For casement windows with rot or frame damage, Star-ws offers casement window rot repair and hardware replacement as a combined service. For broader projects, the window and door hardware replacement service covers the full range of residential and commercial hardware types. Contact Star-ws for a free estimate.
FAQ
What are the main types of window hardware?
The main types are crank operators, sash balances, sash locks, tilt latches, friction hinges, multi-point locks, rollers, and safety restrictors. Each type is specific to a window style and operating mechanism.
How do I know which replacement part fits my window?
Remove the existing hardware, measure arm length and hole spacing to within 1/16 inch, and locate the manufacturer stamp or part number. Cross-reference that code with a parts database from suppliers like Window Hardware Direct or TruthParts before ordering.
What is the best material for window hardware replacement?
Stainless steel is the most durable option for exterior-facing and high-use hardware. Zinc alloy and plastic components fail significantly faster, especially in humid or coastal environments.
Can I replace window hardware myself?
Most hardware replacements are DIY-friendly if you measure accurately and source the correct part. Complex systems like multi-point locks or tilt-and-turn espagnolette bars benefit from professional installation to avoid misalignment.
How often should window hardware be replaced?
Hardware lifespan depends on material and use frequency. Stainless steel components can last 15 or more years. Zinc alloy and plastic parts in high-use windows may need replacement every 5–8 years. Replace any component showing rust, binding, or locking failure immediately.